
Content Created by Tracey of Baker Street Living 
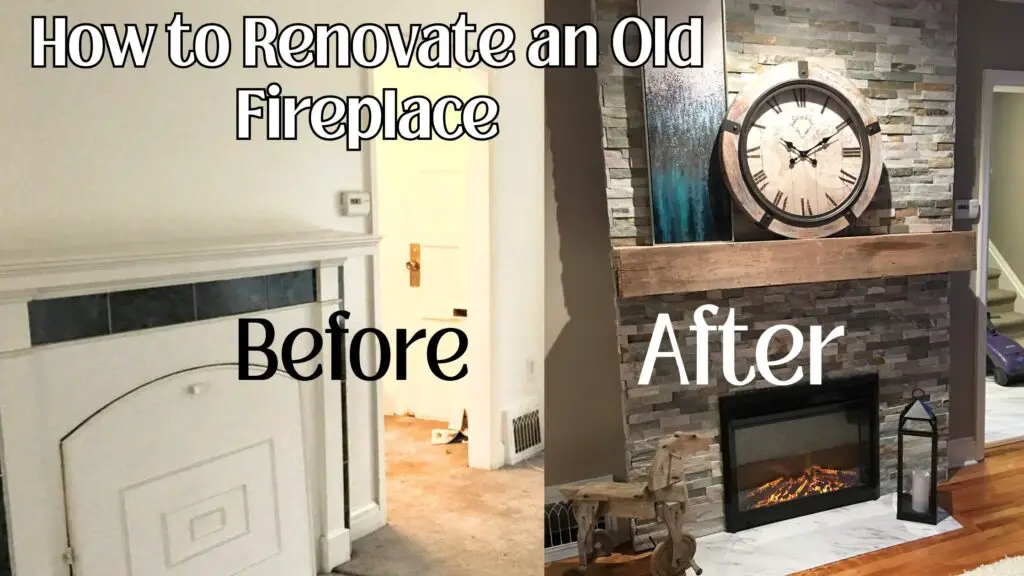
We purchased an 80-year-old brownstone-style townhome, with a plan to renovate and flip it. The home was very outdated, but there were beautiful hardwood floors and an old, outdated fireplace. It had character, presence, and that cozy charm you just can’t fake. Our original plan was simple: refresh the mantle and surround, keep the fireplace intact, and let it remain the heart of the space. How hard can it be to renovate an old fireplace?
That plan changed quickly.
What follows is the story of how we turned an outdated (and unsafe) fireplace into something beautiful, functional, and fully code-compliant, without losing the warmth and ambiance we wanted. If you’re a DIYer tackling an older home, there are some important lessons here.

Items of Interest
This website contains affiliate links. As an Amazon affiliate, I earn a small commission from qualifying purchases (at no cost to you).
- Reclaimed Barn Beam
- Electric Fireplace Insert
- 1-inch Iron Pipe Flanges
- 1 inch Pipe – 6-inch length to fit into flange
Steps to Renovate an Old Fireplace
Step 1: Create a Budget
Are you doing a full home reno, or just one room? The budget can be restrictive or freeing. We were flipping the home, so we wanted to keep the budget as low as possible but not compromise on safety and aesthetics.
Step 2: Start With a Professional Assessment (Seriously)
Before swinging a hammer or picking tile, we had the hearth and chimney assessed by an expert. This step is non-negotiable, especially in older homes.
In our case, the chimney flue was in poor condition and didn’t meet current fire code standards for an open-hearth, wood-burning fireplace. Installing a natural gas insert was technically possible, but it would have required a stainless-steel flue liner running the full height of the house (two stories plus an attic). That option was cost-prohibitive and hard to justify for a flip.
After weighing safety, cost, and aesthetics, we landed on the best solution for us: an electric fireplace insert. It gave us the look and warmth we wanted, met insurance and building code requirements, and eliminated future maintenance concerns.
DIY takeaway: Let the facts guide your design. Safety and code always come first; everything else follows.
Step 4: Demolition – Out With the Old
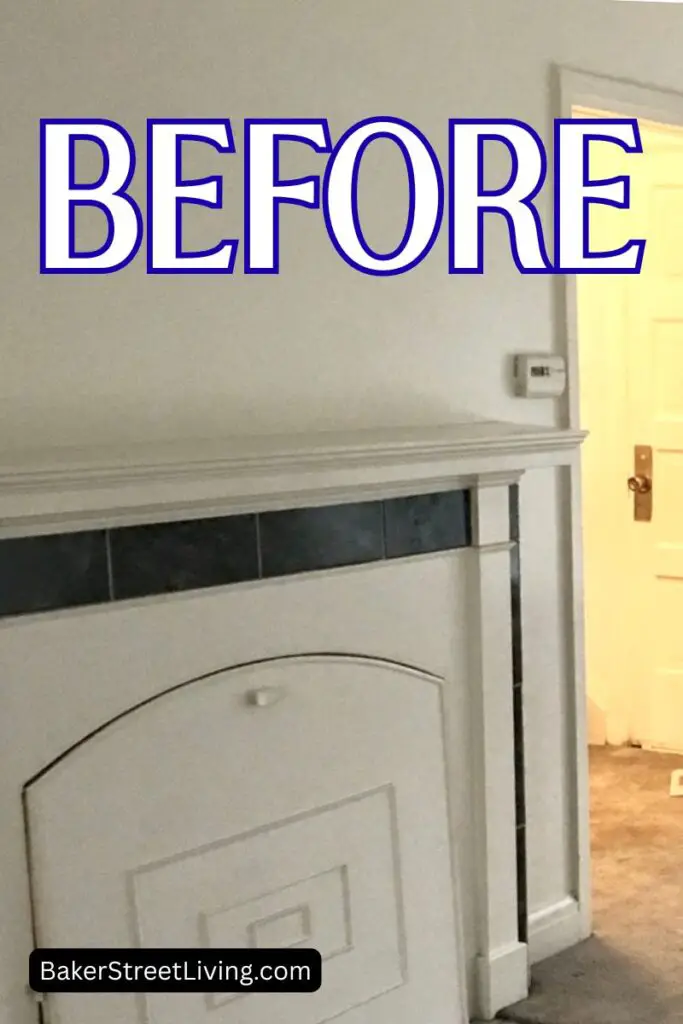
The original hearth was flush with the floor and covered in red ceramic tile over a cement base. Since the electric fireplace was rated for direct contact with the floor, there was no fire risk, meaning we could leave the existing hearth structure in place.
We decided to cover the old tile with large, white marble-look vinyl floor tiles for a clean, modern update.
With that decision made, we demolished the old wooden mantel and ceramic tile surround. Once everything was removed, the original red clay brick firebox was revealed, protruding about 3 inches from the wall.
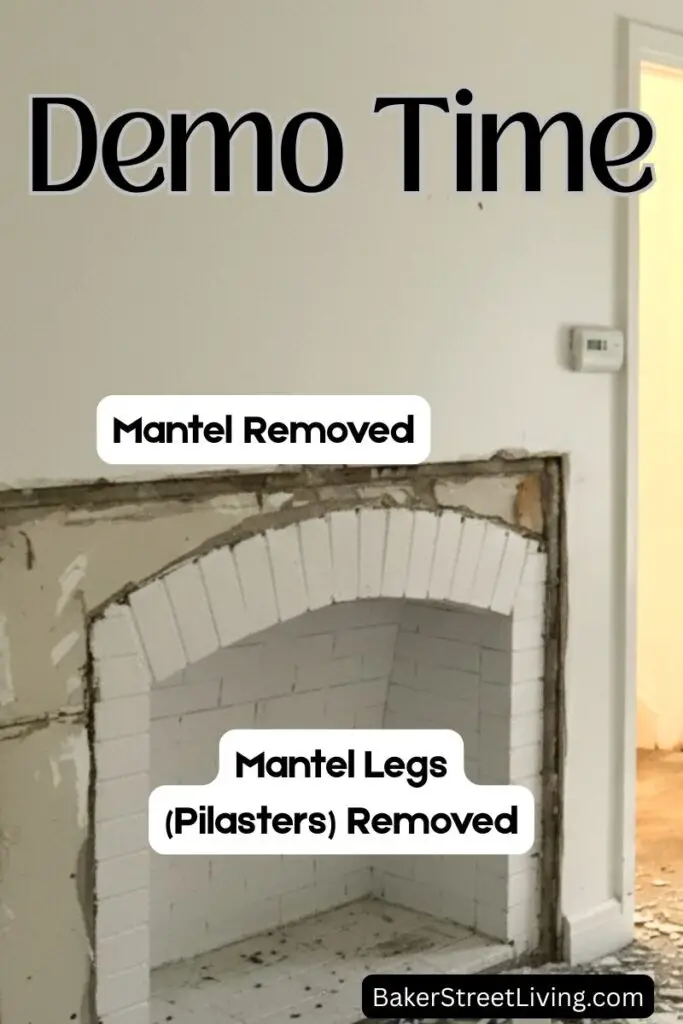
DIY takeaway: Sometimes the best demolition decision is knowing what not to remove.
Step 3: Measure Everything and Plan Power Early
Once we committed to an electric insert, precise measurements were critical. We carefully measured the firebox opening, height, width, and depth, and found a unit that fit perfectly. The original firebox was arched, so we knew we had to cover the arch and bring it up to date with a more traditional look.

Before moving forward, we dry-fit the unit into the firebox to confirm the dimensions. This saved us from potential headaches later.
To keep the final look clean and professional, we wanted the power cord completely hidden. We ran a 14/2 electrical cable from the basement up through the existing ash cleanout and installed a dedicated receptacle inside the firebox. You may need to hire an electrician to complete this step. The old ash return cleanout was a fantastic solution for running the power.
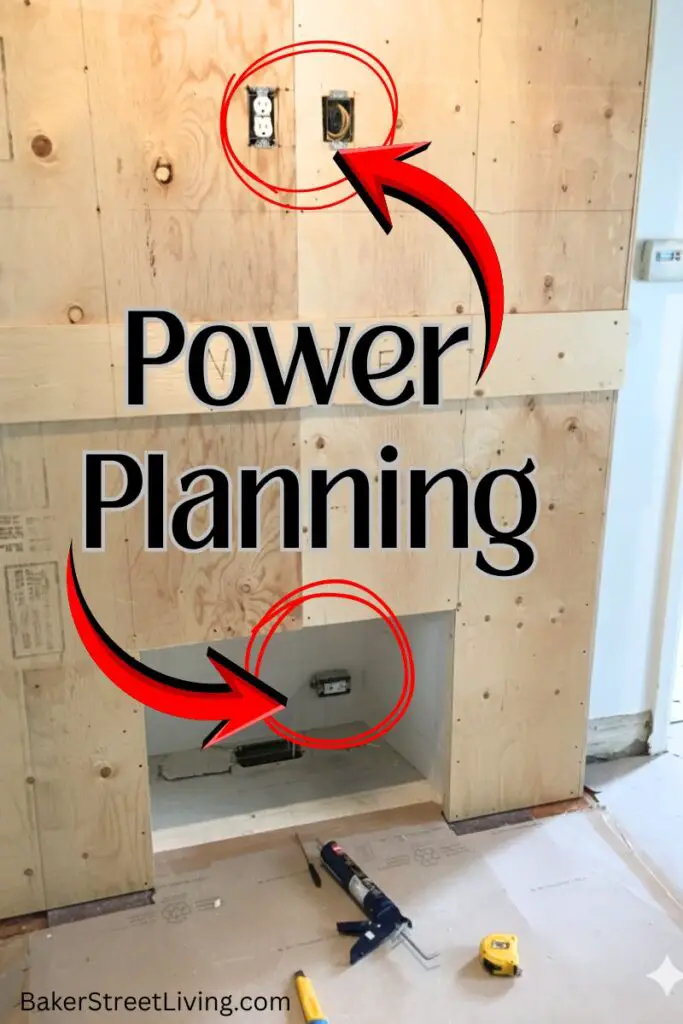
DIY takeaway: Always dry-fit major components, and plan electrical before closing up walls or finishes.
Step 4: Building the New Surround
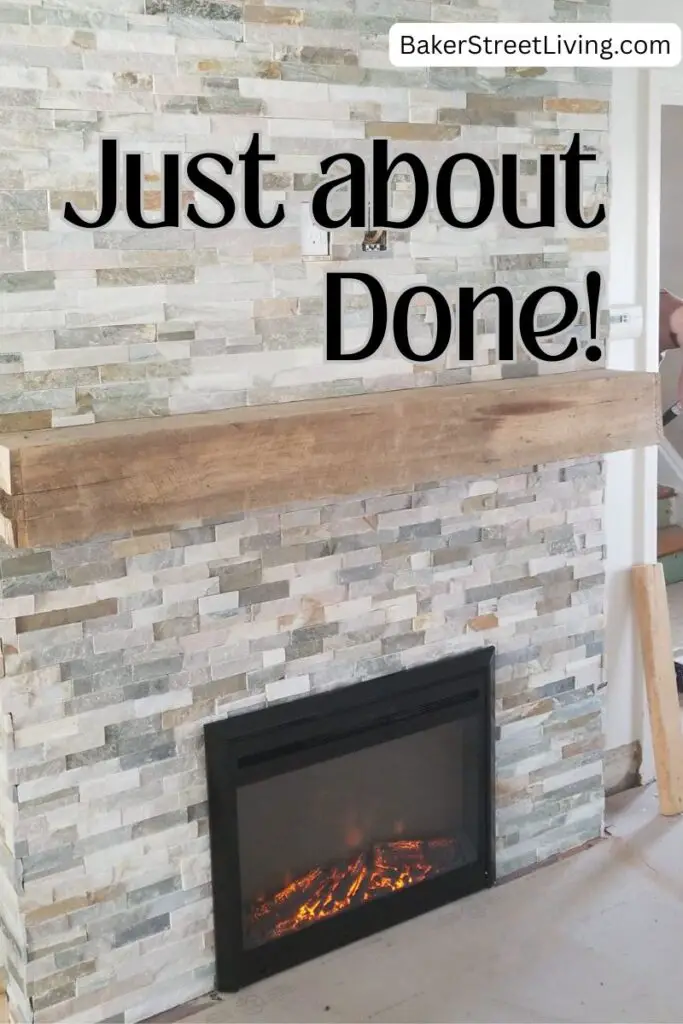
For the new surround, we chose a natural stone tile paired with a rustic reclaimed barn beam mantle.
One big advantage of the stone tile we selected: no grout lines. That made installation much more forgiving for the average DIYer and considerably sped up the process.
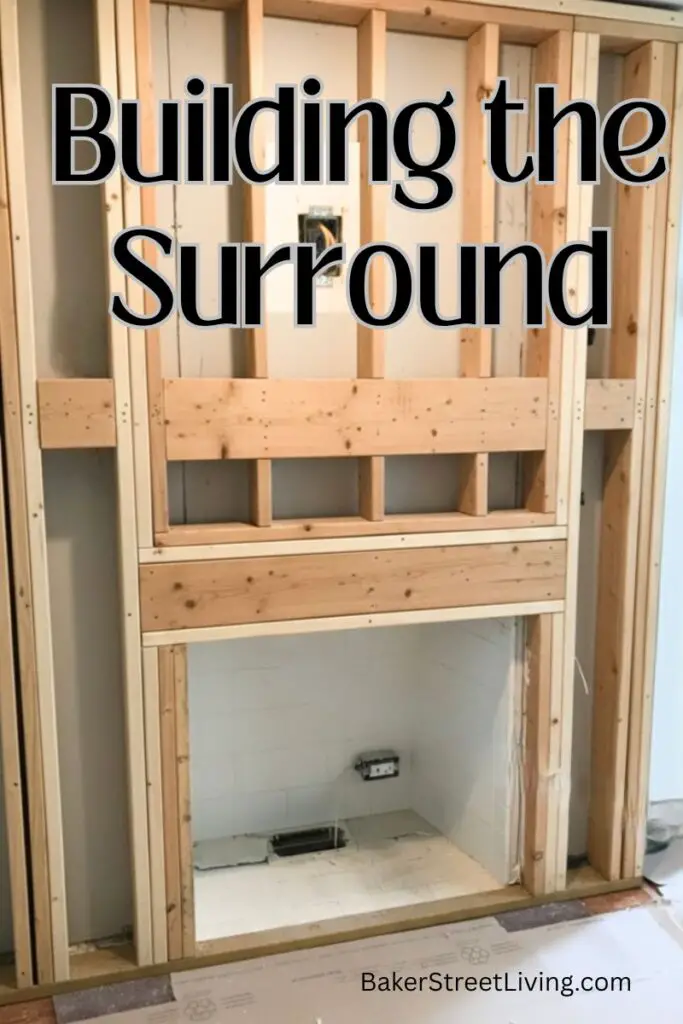
For aesthetics and ease of installation, we decided the finished surround should project about 7 inches from the wall. To achieve this:
- We framed around the existing firebox and extended framing to the ceiling using 2x4s on 16″ centers.
- Holes were drilled through the 2x4s so we could fasten them to existing studs and masonry without using extra-long screws.
- Because the tile required a rigid base, we used ¾” plywood as the substrate to prevent flexing.
- To hit the final 7″ depth, the 2x4s were ripped down to the exact thickness needed.
DIY takeaway: Stone tile demands a solid substrate. This is not the place to cut corners
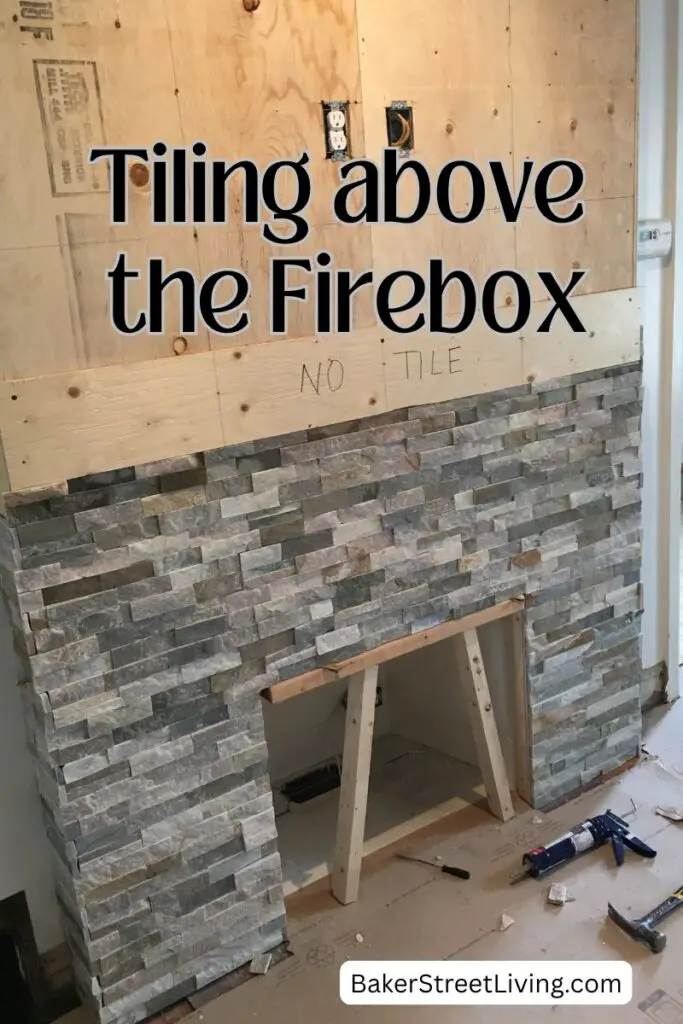
Step 5: Tiling
Tiling the fireplace façade was one of those steps where patience really paid off. We started at the very bottom, taking extra time to ensure our first row was perfectly flat and level. This foundation is critical. Even a small error at the base can become much more noticeable as you work your way up. We dry-fit a few tiles first, checked our spacing, and adjusted as needed before committing to adhesive. Getting that first row right gave us a reliable guide for everything that followed
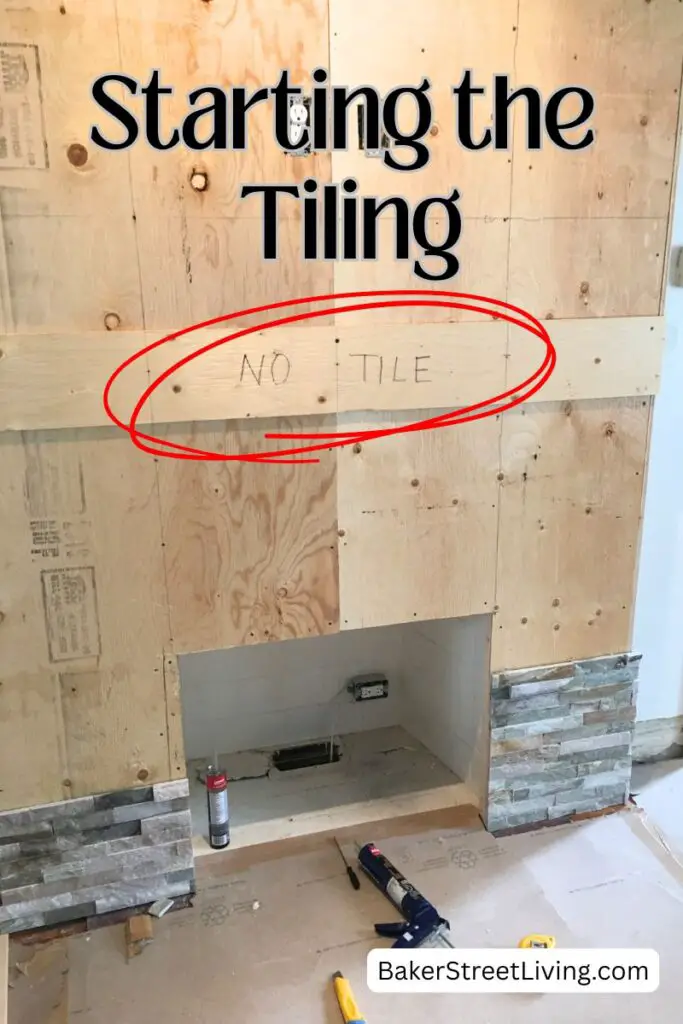
Once the base was set, the rest of the tiling became a steady rhythm of measure, place, and check. We worked row by row upward, periodically stepping back to confirm everything stayed aligned and checking for level. Maintaining consistent spacing and level lines helped the finished façade look clean and professional. Taking our time during this stage made a huge difference. The tile lines stayed crisp, and the fireplace quickly transformed into a polished focal point of the room.
To tile around the firebox, we created a small removable shelf above the firebox to support the tile while the adhesive cured. Once again, making sure everything was straight and level.
Step 6: Mounting the Barn Beam Mantel
The mantel was one of our favourite elements of the entire project.
We sourced an old but clean 8″ square barn beam locally. To preserve its character, we cleaned it with a stiff-bristle brush rather than sanding away the patina. After cutting it to length with a rented 10″ worm-drive saw, it was ready to mount.
Instead of traditional brackets, we used 1″ cast-iron pipe and fittings, which remain completely hidden.
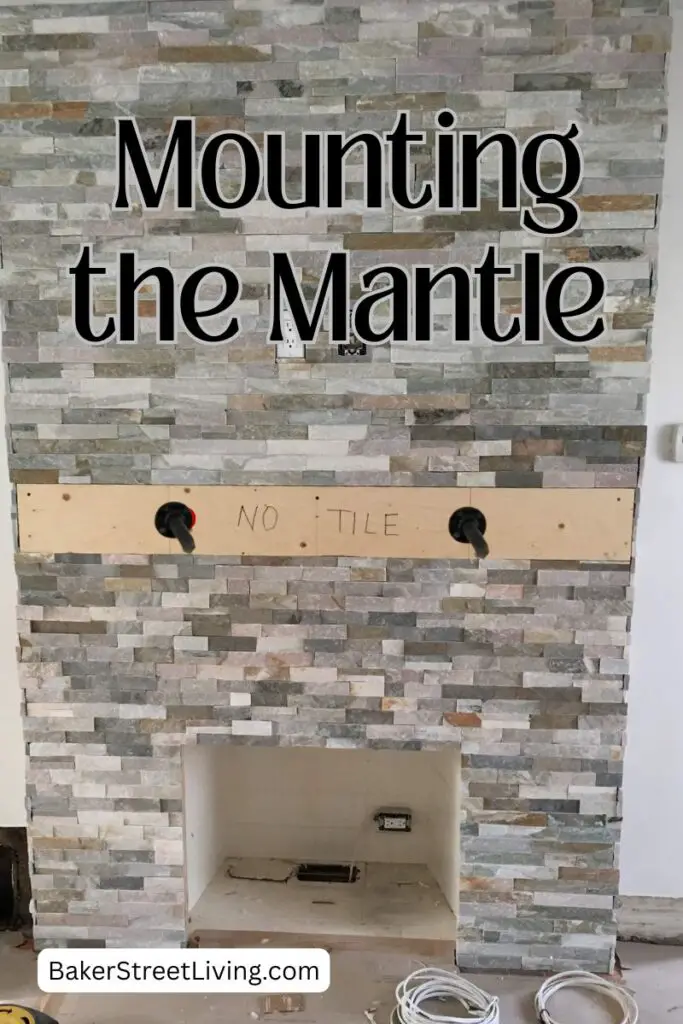
How We Mounted It:
- Built out the mounting area with a piece of ½” plywood secured to the framing so the mantle would appear to float directly off the stone.
- Cut two 4″ holes in the plywood and installed cast-iron pipe flanges, fastening them securely into the framing behind.
- Threaded two 6″ lengths of 1″ cast-iron pipe into the flanges.
- Carefully lifted the mantle into place, levelled it, and marked hole locations.
- Drilled 1″ holes into the back of the beam, keeping them perfectly perpendicular.
- Pressed the mantle onto the pipes. A very tight fit that required gentle persuasion with a 4-lb sledgehammer.
Pro tip: Protect the face of the beam with scrap wood before hammering to avoid surface damage.
DIY takeaway: Hidden mounting systems take more planning, but the result is absolutely worth it.
Adding the Insert
This was quick and easy to do. Since we had planned and installed a plug in the firebox, it was a matter of sliding the unit in and following the mounting instructions. This is when the planning and proper measuring pay off.
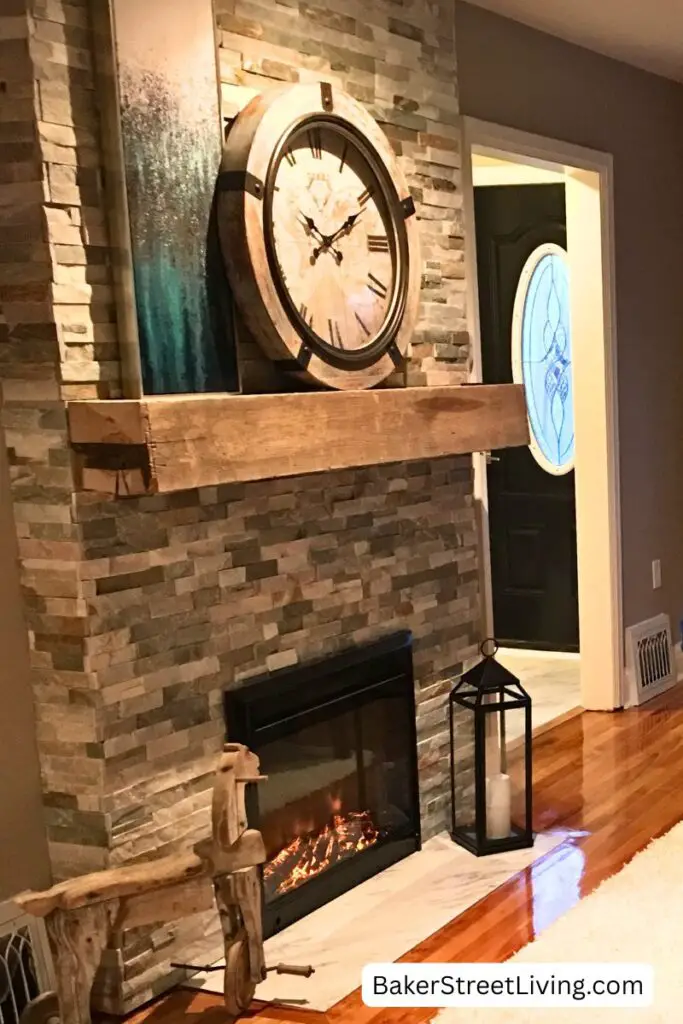
The Final Touches (and the Payoff)
With the mantel mounted, we cleaned the existing red tile and installed the marble-look vinyl tiles over the hearth. The electric fireplace was plugged in and slid neatly into place.
The transformation was dramatic.
What started as a charming but unsafe fireplace became a warm, modern focal point that still respected the home’s character,while meeting current building and insurance standards.
And yes… the final result was amazing.
Final Thoughts for DIYers
- Always assess fireplaces professionally before renovating.
- Electric inserts can be an excellent, cost-effective alternative in older homes.
- Solid framing and substrates make all the difference with stone finishes.
- Thoughtful details, like a reclaimed beam or hidden hardware, elevate a project from “DIY” to “designer.”
If you’re planning to renovate an old fireplace yourself, don’t rush it. Plan carefully, respect the structure, and build it once, the right way.


This website contains affiliate links. As an Amazon affiliate, I earn a small commission from qualifying purchases (at no cost to you).