
Content Created by Tracey of Baker Street Living 
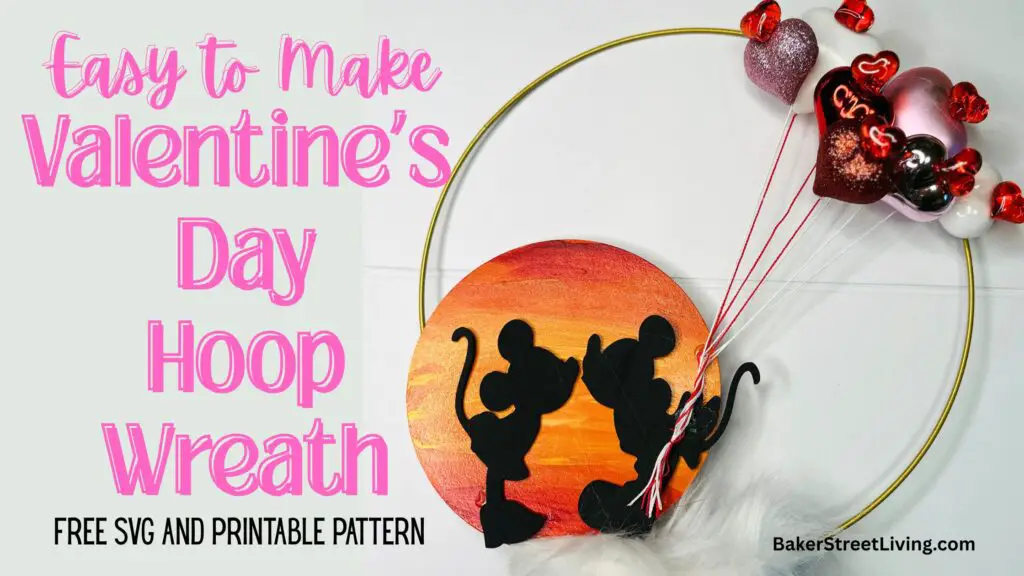
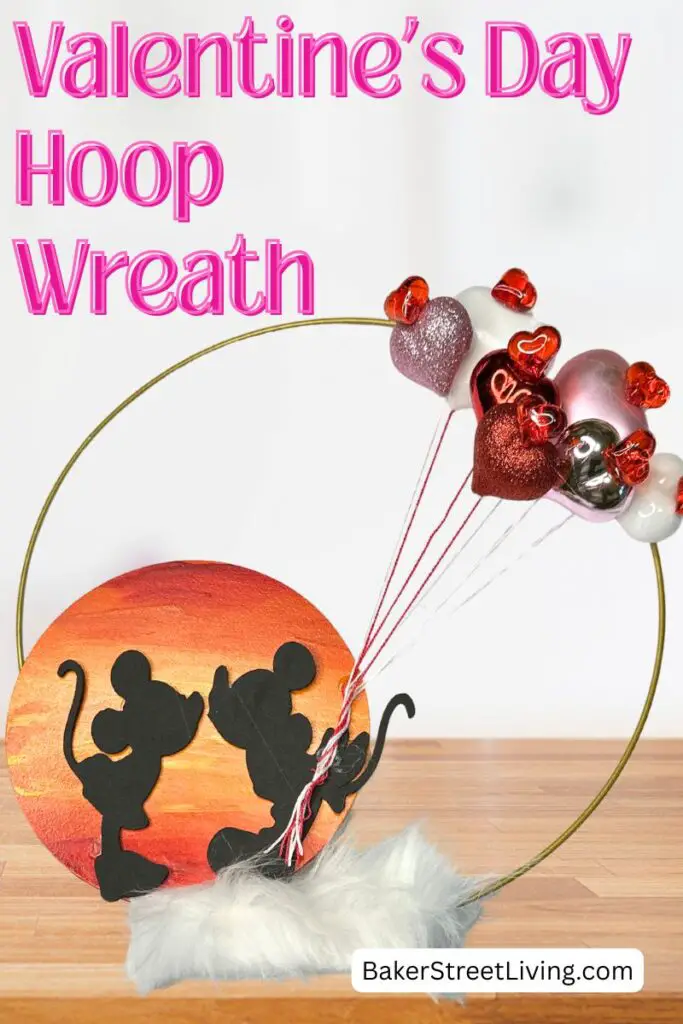
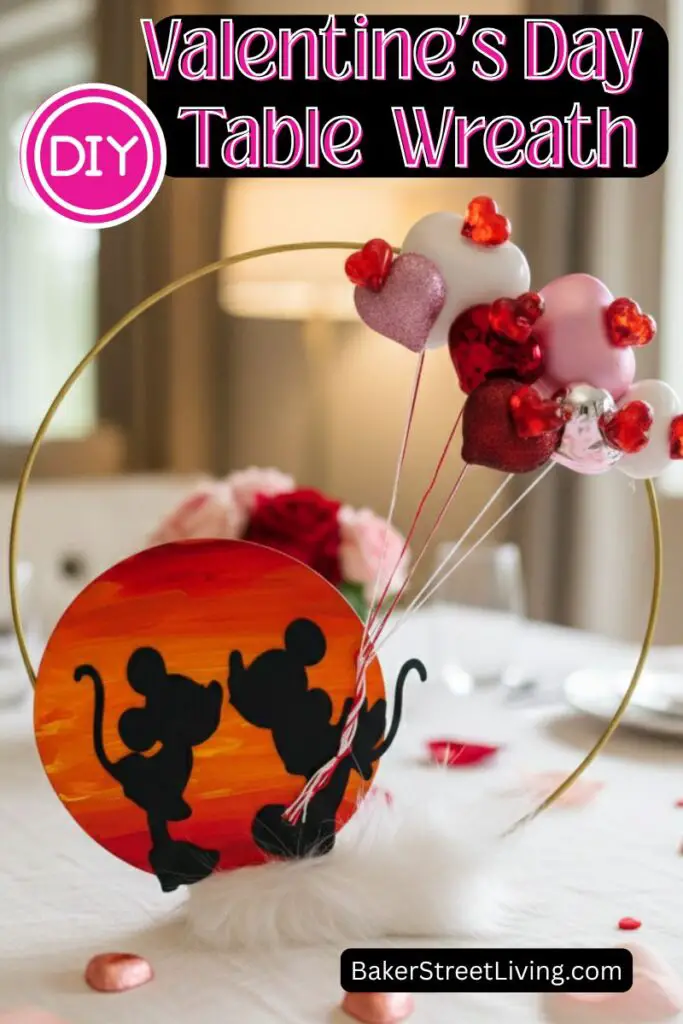
Making a Valentine’s Day hoop wreath is a fun and whimsical way to decorate your home for Valentine’s Day, and using a floral hoop gives the wreath a light, modern look. This project is especially charming when you add a playful theme, like Mickey and Minnie sharing a sweet Valentine’s kiss. The simplicity of the hoop paired with the iconic Disney couple creates a delightful balance of elegance and nostalgia, making this wreath a standout piece.
What You’ll Need
This website contains affiliate links. As an Amazon affiliate, I earn a small commission from qualifying purchases (at no cost to you).
- Floral Hoop
- EVA craft Foam
- String
- Mini Heart Ornaments
- 6-inch Round Wood Disk
- Sunbeam Yellow Acrylic paint
- Orange Acrylic Paint
- Dark Orange Acrylic paint
- Spray Primer -White
- Spray Acrylic Sealer
- Palette paper or paint palette
- Craft Paint Brush -1/2 inch or up to a 1-inch Flat brush
- Craft paper
- Pink Faux Fur
- Heart-Shaped Gems
- Hot Glue Gun with Glue
- Folded towel
- Wax paper
- Craft tweezers
How to Make our Valentine’s Day Hoop Wreath
If you are using our Disney-inspired image, download the SVG or printable pattern
For Cutting Machine Users
Download the Valentine’s Day Hoop Wreath SVG from our free resource library.
Upload the file into your cutting machine program *I am using Cricut Design Space)
Resize if desired.
Once sized, choose “Make” or the appropriate selection and send the file to your cutting mat page.
Select material (EVA Foam 2mm)
Select Pressure and then cut.
For Printable Pattern Users
Download the printable Valentine’s Day Hoop Wreath pattern.
If you wish to resize, you can resize in Canva or a similar graphics program.
Cut around the pattern and use it as a template to cut out the foam pieces.
@mm EVA foam can be cut with scissors, but for thicker foam, an Xacto knife and cutting mat are recommended.
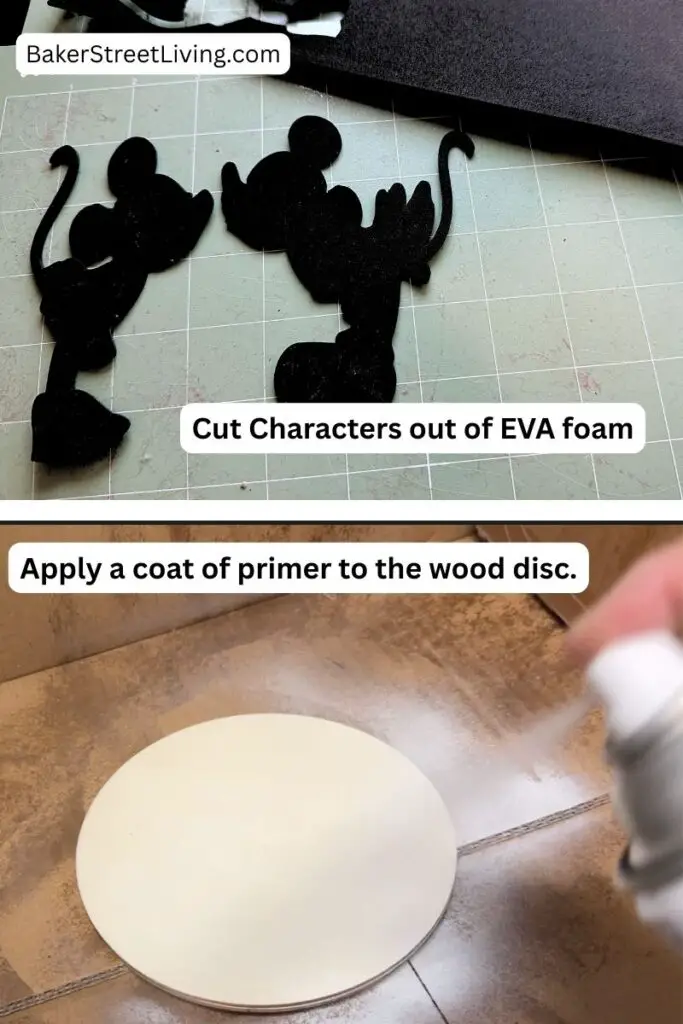
Paint the Sunset Disc
Before painting, make sure the wood blank is clean. A quick wipe with a lint-free cloth removes any dust or dirt from the surface.
This step requires that you work quickly. Do not let the paint dry before blending or mixing the colours.
Cover the wood with a coat of sealant or white primer before starting. Allow it to dry completely before painting. This will prevenmt the paint from absorbing, making blending difficult.
After drying, buff with a piece of craft paper and wipe away any dust.
Add 3 colours of paint for the sunset background into the paint palette or onto a sheet of palette paper.

Start by painting the bottom 1/3 to 1/2 of the board yellow.
Next, add the orange to the middle to upper third, blending the paint.
Add the dark orange to the top of the sunset and make sure you blend the colours well.
If you are unsatisfied with the blending, keep adding paint and work on blending until it resembles an ombre look with no obvious lines between colours.
Allow the paint to fully dry.
Lightly sand with craft paper and wipe away dust.
Apply a coat of gloss sealant (Matte if you prefer) and allow to dry

Assembling the Wreath
Cover your work surface.

Insert the floral hoop into its base and lay it on its side.
Lay the sunset disc onto the ring and mark the top edge of it on the hoop.
Add a generous amount of hot glue onto the hoop up to the he mark.
Flip the hoop over and add more glue, and press the ring onto the disc. You may need to hold it for a few seconds to ensure it stays in place.
Flip the hoop over and rest it on a folded towel covered with a piece of wax paper.
Allow the hoop and sic to rest and dry while you prepare the ornaments.
Prepare the ornaments
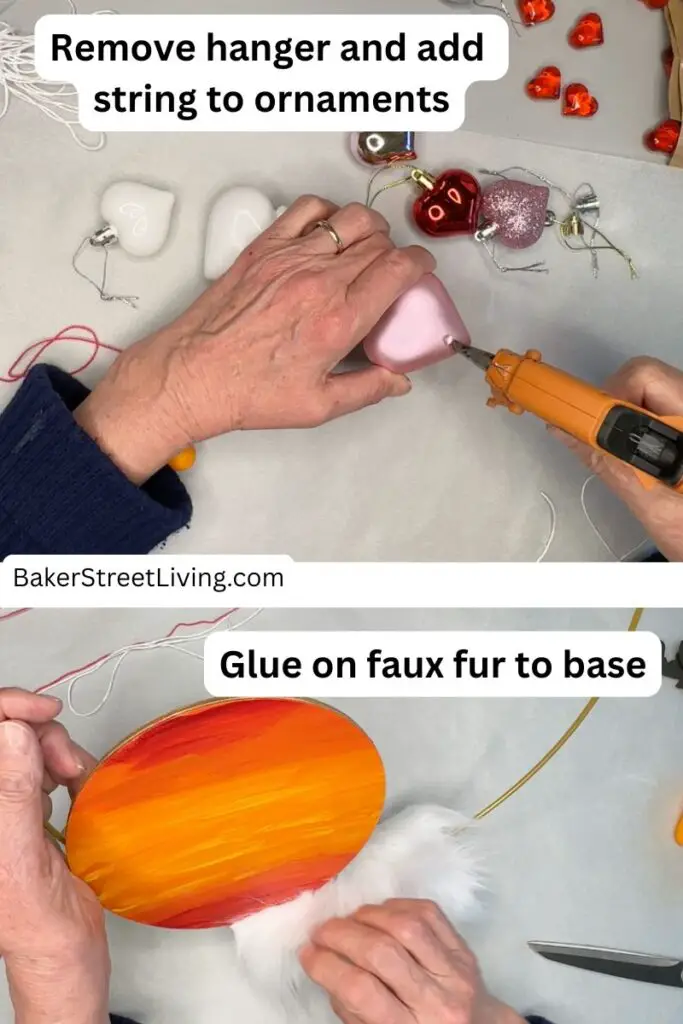
Remove the hanger from the top of each ornament.
Cut 1 – 12 to 13-inch piece of string for each ornament.
Add a small bead of hot glue at the point of the heart, slightly to the back, so that the glue is not visible.
Using Craft tweezers, press the string into the glue.
Set ornaments aside to dry.
Adhere Characters
Add a bead of hot glue to the wooden base and adhere faux fur to cover the block.
Adhere the foam shadow characters to the painted disc. The characters’ feet should be resting on the fur.
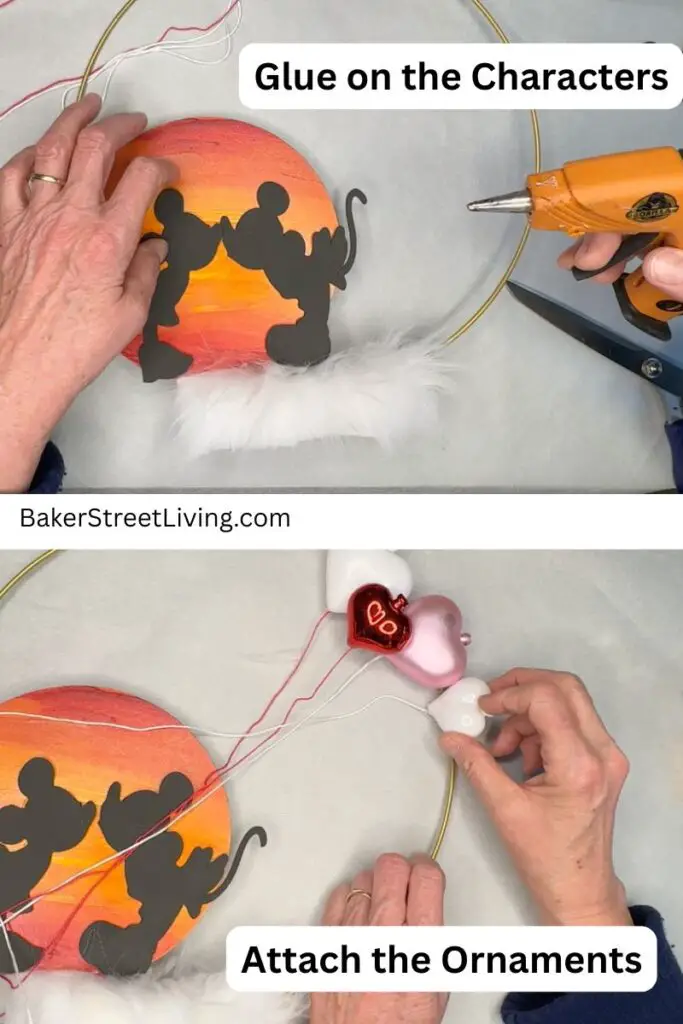
Add Ornaments
While you have the hoop wreath lying flat, adhere the ornaments to the hoop. I like to attach them a little off to the right of the top of the hoop.
Add all the ornaments, so that they overlap, with the larger ones at the back and the smaller ones on top. This may take a few minutes, and you may need to hold the ornaments in place while they are drying.
Once dry, apply hot glue to the stem of the ornaments and adhere the heart gems.
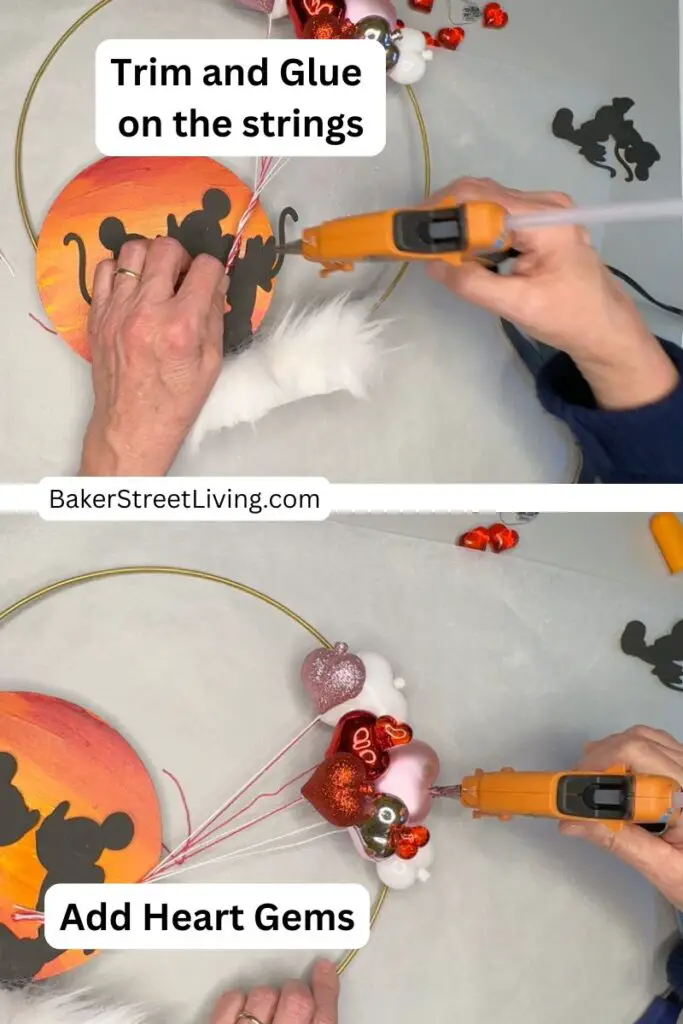
Gather all the other strings together and pull them toward Mickey’s hand, and cut them so that they just hang about 1/4 to 1/2 inch past the bottom of his hand. Tie them with a piece of string. Cut it so it doesn’t show.
Attach the string to Mickey’s hand using hot glue.
Allow everything to dry before standing the wreath up.
Once dry, stand up the Valentine’s Day Hoop Wreath and use it as a display pr centerpiece on your Valentine’s Day table.


Helpful Tips
Alertnative Ornaments
If you wish to use plain ornaments from a leftover Christmas stash, then by all means go ahead. I purchased the heart ornaments specifically for this wreath, but any small ornaments will do.
Using thicker EVA Foam
If you have a cutting machine and want to use a thicker Eva foam that your machine is capable of cutting, you can easily make a pattern from cardstock or download the printable pattern and use it as a template.
Storing Instructions
Store wrapped in layers of loose tissue paper or bubble wrap. If possible, place it in a hard-sided pizza box or similar sized bow to prevent damage or ubiing ion the paint.

This website contains affiliate links. As an Amazon affiliate, I earn a small commission from qualifying purchases (at no cost to you).