
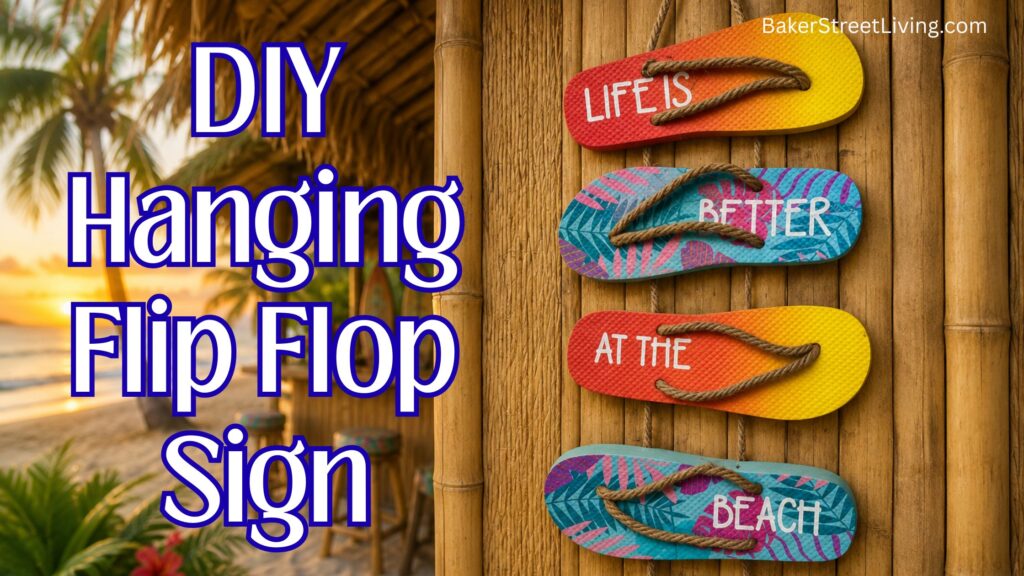
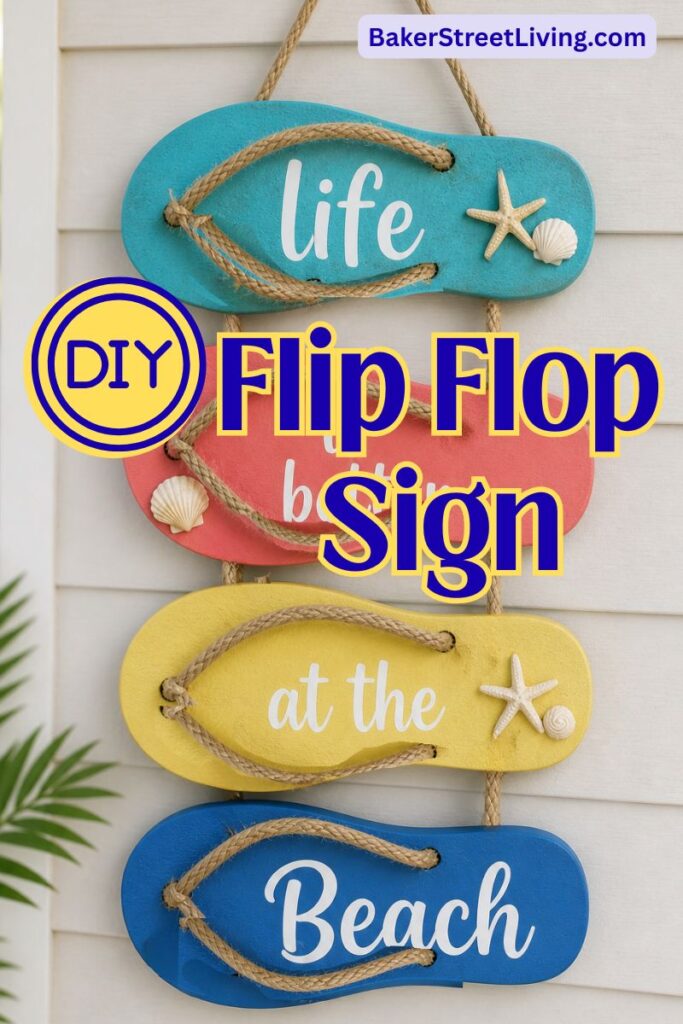
f you love beachy decor and simple upcycling projects, this DIY flip flop sign is the perfect craft for you. Using inexpensive or old (but clean) flip flops, a bit of jute rope, and vinyl lettering, you can create a charming vertical sign that instantly adds a relaxed, coastal vibe to your space.
This project is beginner-friendly, budget-conscious, and completely customizable. Perfect for summer decorating, cottages, patios, or even as a handmade gift.

Why You’ll Love This Project
This DIY flip flop hanging sign is:
- A great way to upcycle old or dollar-store flip flops
- Quick and easy (can be done in under an hour)
- Customizable with your favourite sayings
- Perfect for indoor or covered outdoor decor
- Lightweight and easy to hang
Supplies You’ll Need
This website contains affiliate links. As an Amazon affiliate, I earn a small commission from qualifying purchases (at no cost to you).
- 4 flip flops (matching or coordinating colours). Check out dollar stores for an inexpensive option
- Jute rope (for straps and hanging)
- Adhesive vinyl (permanent or removable)
- Cutting machine (like Cricut or Silhouette)
- Transfer tape (low tack)
- Hot glue gun and glue sticks
- Scissors
- Decorative shells or beach embellishments. (Optional)
How to Make a Flip Flop Sign Step-by-Step Instructions
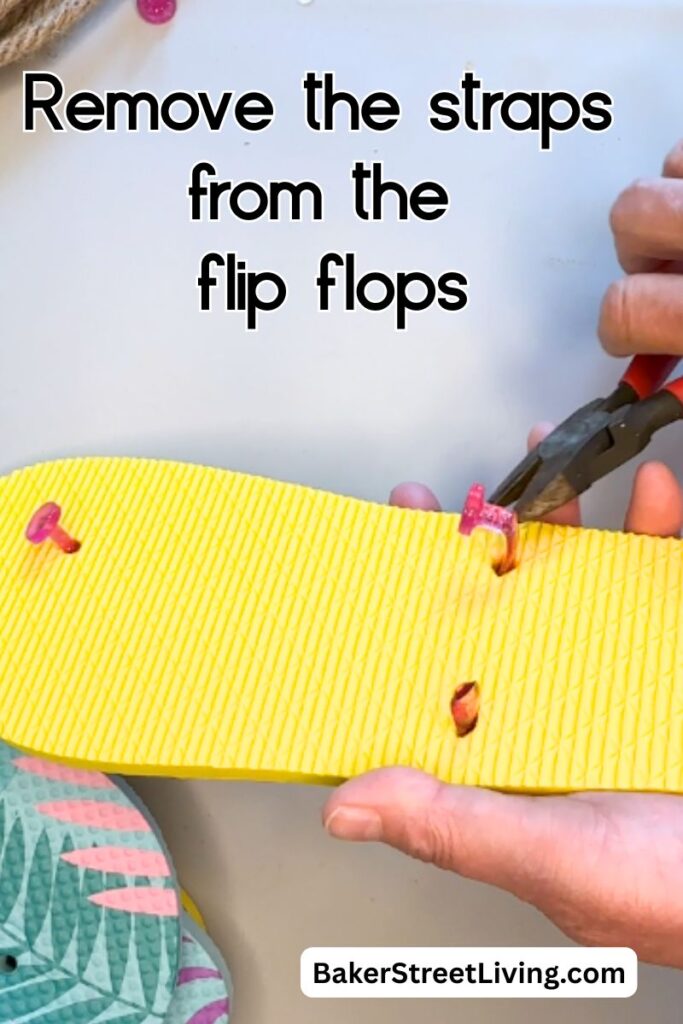
Step 1: Prepare the Flip Flops
Start by removing the original straps from all four flip flops. You’ll be left with the foam base, which will act as your “sign boards.”
If your flip flops have any dirt or residue, give them a quick clean and let them dry completely.
Step 2: Plan Your Layout
Lay your flip flops out vertically on a flat surface, spacing them about 2–3 inches apart. Measure the flip flops so that you can choose a suitable font size.
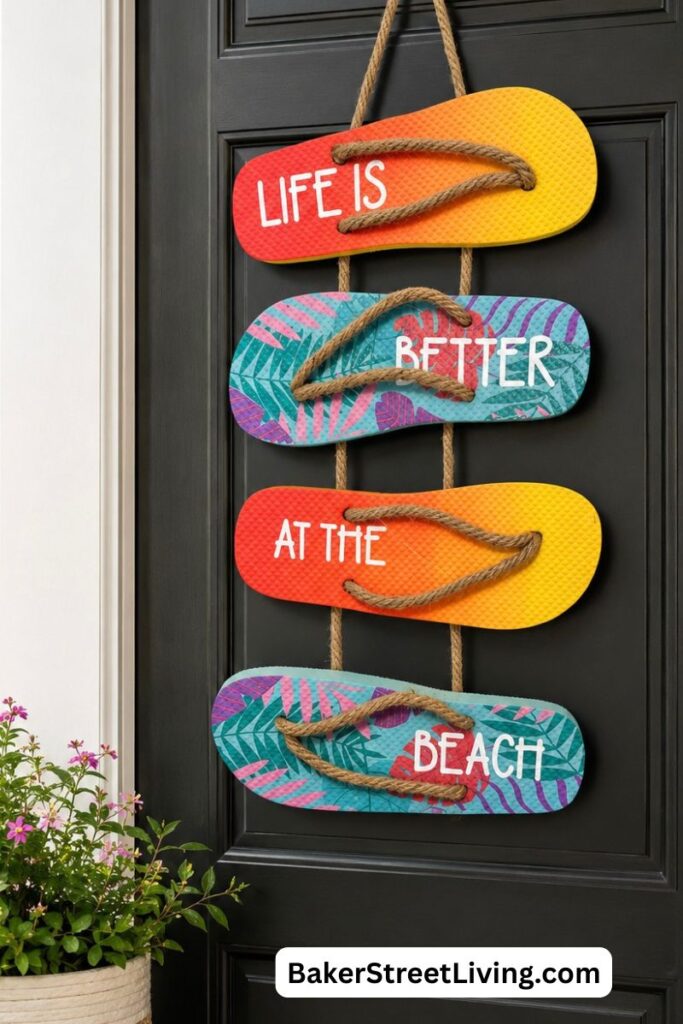
Arrange them in the order you want your words to appear. For example:
- Flip flop 1: LIFE
- Flip flop 2: IS BETTER
- Flip flop 3: AT THE
- Flip flop 4: BEACH
Step 4: Add Jute Rope Straps
Cut pieces of jute rope to replace the original straps. Wrap the ends of the rope in clear tape to make threading the rope through the holes of the flip flop easier.
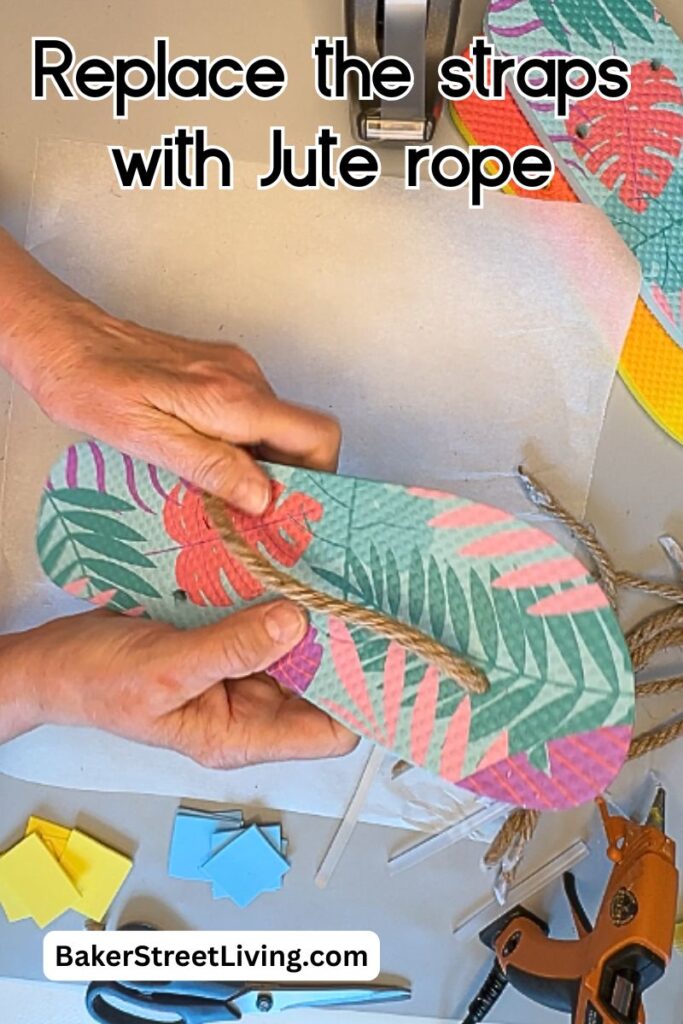
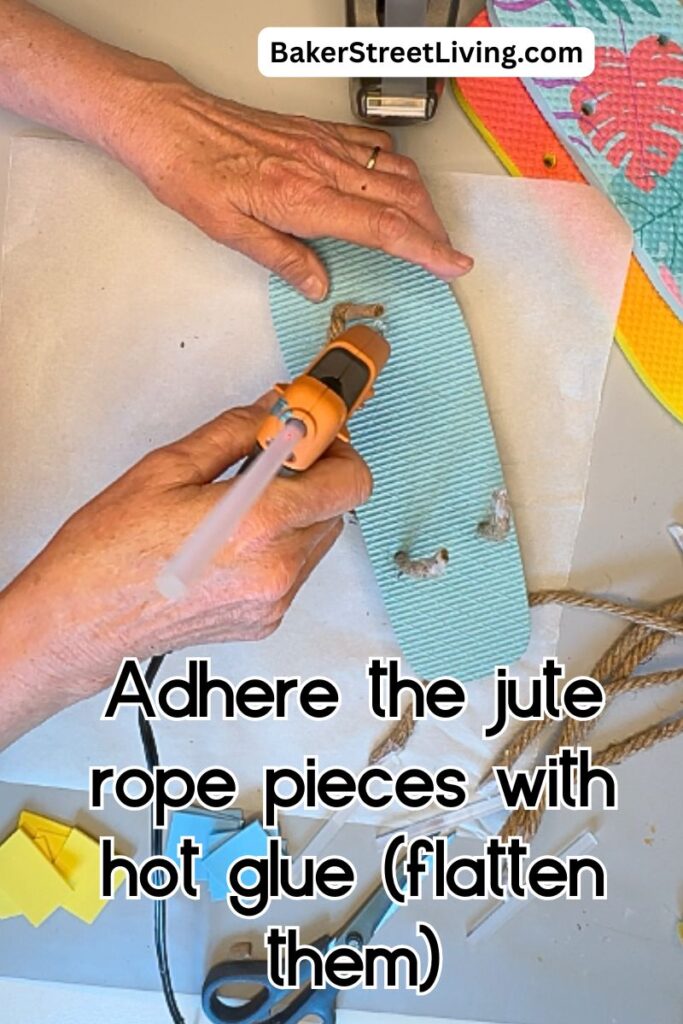
Thread the rope through the existing holes in each flip-flop, Secure them tightly underneath, lay them flat, and secure with hot glue.
When threading the toe jole, make the hole larger if needed. Twist a pair of closed scissors around in the hole to stretch it. Do not cut it.
Repeat for each flip flop in the sign.
This step instantly gives your project that rustic, beachy feel.
Step 3: Create, Cut and Apply Vinyl Lettering
On your cutting machine software, choose a suitable font that fits your style. It is easier to see bold, clear fonts than fonts that are elegant and fine. Using your cutting machine, cut out your phrase.
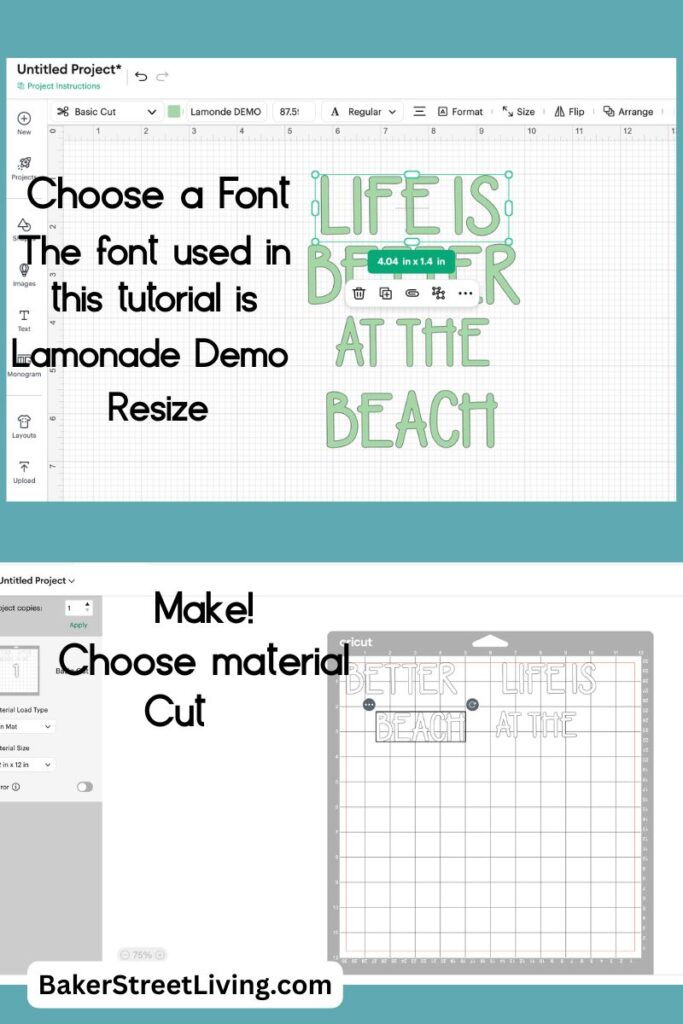
The phrase I am using is “Life is Better at the Beach.”
Weed your design and apply transfer tape. Cut into four pieces for easier application to each flip flop.
Carefully place the lettering on each flip-flop, pressing firmly to ensure good adhesion. Smooth out any bubbles and gently remove the transfer tape. Use a scraper tool to help adhere the letters. Depending on the surface of the flip flip, this can be difficult. To increase the ease of adherence, wipe the surface of the flip flop with a damp cloth and allow it to dry.
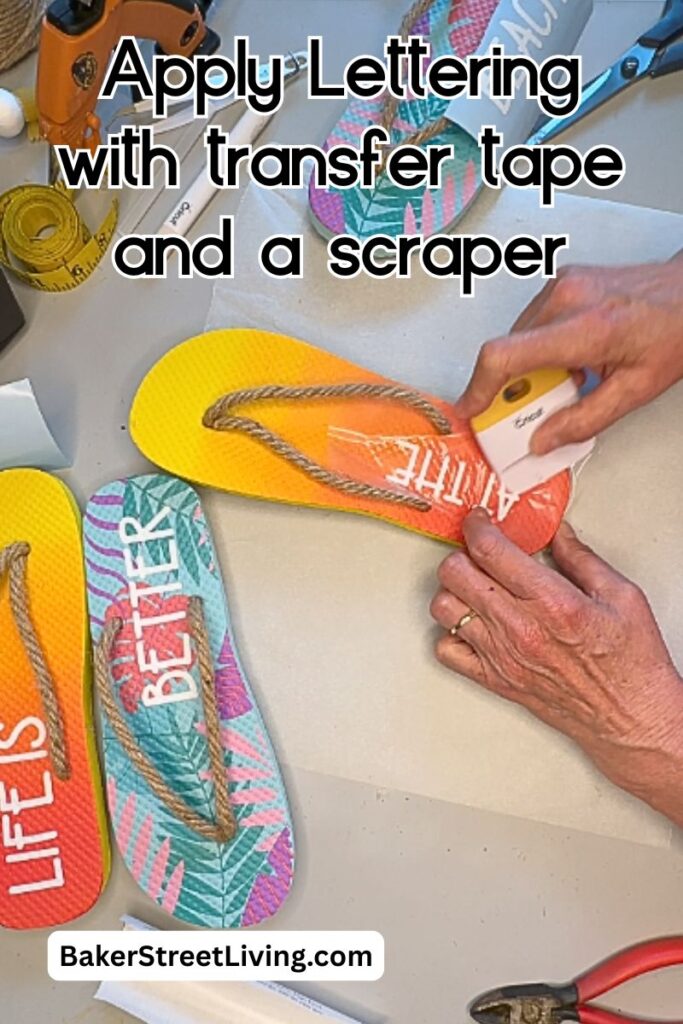
Tip: Use contrasting vinyl colours so your words stand out clearly against the flip flops.
If your flip flop sign will be outdoors, you can add a thin coat of outdoor Mod Podge.
Add Hanging Rope
Turn the shoes over so the back is exposed.
Space them 3-4 inches apart as shown.
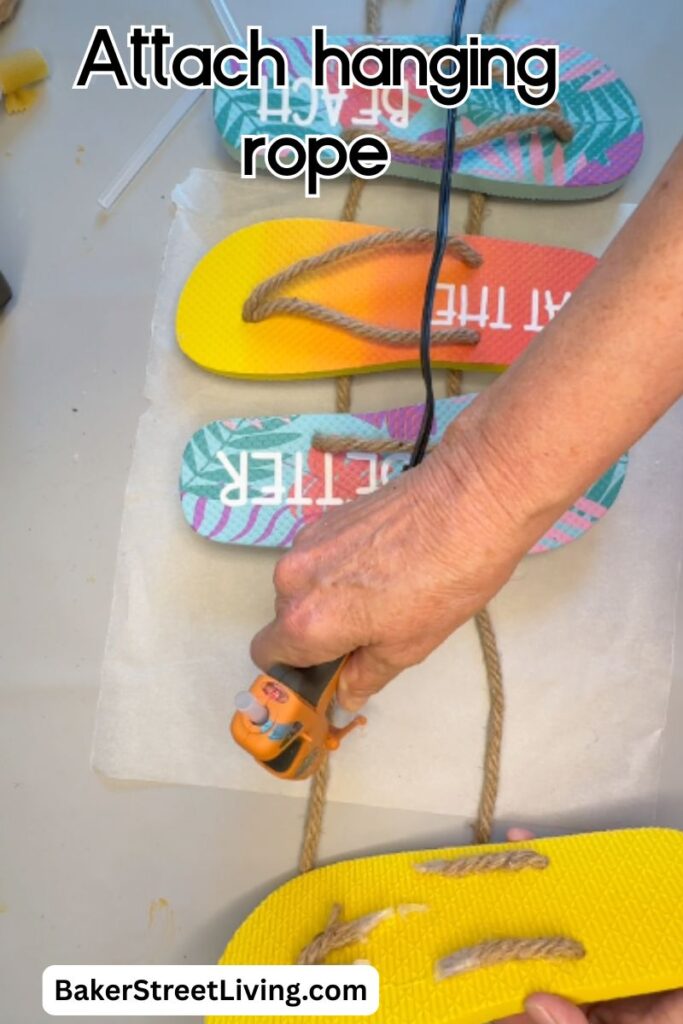
Glue the folded rope to the back of the flip flops. Make sure that the shoes are evenly spaced and straight.
Allow the glue to dry before flipping over.
Knot the ends of the rope, cut it on the back of the bottom flip flop, and glue it in place.

Embellish.
Turn the flip flop sign over, facing up. Add shells or nautical embellishments to finish it off.
Hang and Enjoy!

Tips for Success
Alternative Lettering
If you don’t have a cutting machine, feel free to use peel-and-stick lettering. Measure before buying lettering to ensure a good fit.
Draw your own lettering with broad-tipped sharpies. This is a great way to make this project kid-friendly.
Use stencils and paint to get crisp painted lettering.
Lastly, you could use rubber stamps to add lettering.
Customization Ideas
Make this project your own with these creative variations:
- Use different sayings like “Welcome,” “Beach House,” “Life is better on the lake,” or add a name with a welcome message
- For used flip flops, paint the flip flops before adding vinyl for a custom colour palette. If using outdoors, choose outdoor-friendly paint.
- Distress the edges for a weathered coastal look
- Add beads or knots between each flip flop for extra detail
- Use patterned vinyl for a bold design
This DIY flip flop hanging sign is a fun and creative way to bring a little piece of the beach into your home. Whether you’re decorating for summer or adding personality to your cottage, this upcycled craft is both stylish and meaningful.
Plus, it’s a great conversation piece. No one will believe it started as simple flip flops!

This website contains affiliate links. As an Amazon affiliate, I earn a small commission from qualifying purchases (at no cost to you).