
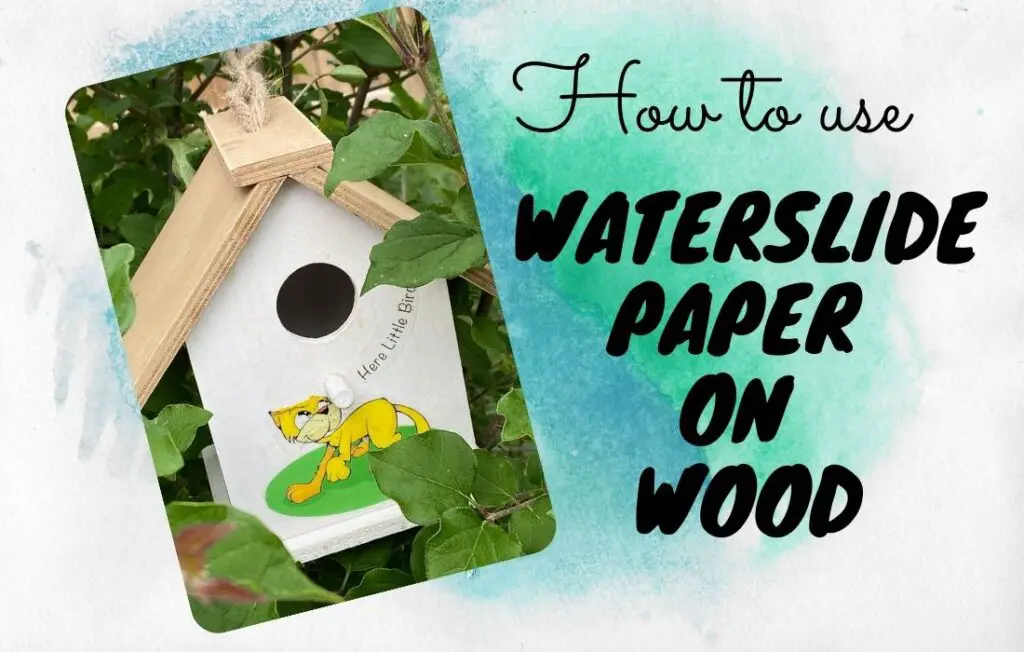
Have you ever wanted to transfer an image onto wood and wondered what the easiest way to accomplish it would be? Waterslide paper may be the answer you are looking for. Perhaps you have already used waterslide paper and wondered if you can use waterslide paper on wood. Well, the answer is a definite yes.
Waterslide paper is easy to use on many surfaces, as you may have seen on some of our other posts. It is often used on glass and ceramics, but is so versatile that it can be used on wax candles, canvas and mirrors. Check out our tutorial on using waterslide paper on a mirror in our Halloween Haunted Mirror project.
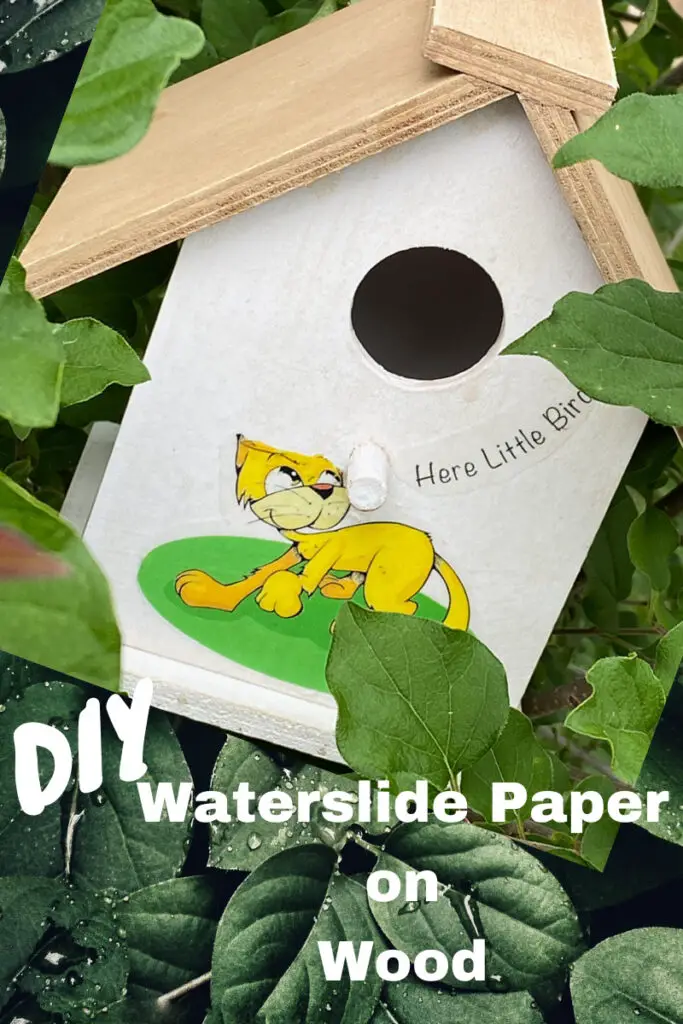
How to use Waterslide paper on wood
Choosing your wood item that is compatible with using waterslide paper on wood
When choosing wood, be sure that the surface is smooth to semi-smooth. Waterslide paper glides off its backing paper when you are applying it. A wood surface that is bumpy or has a lot of texture can cause the waterslide paper to tear and come apart.
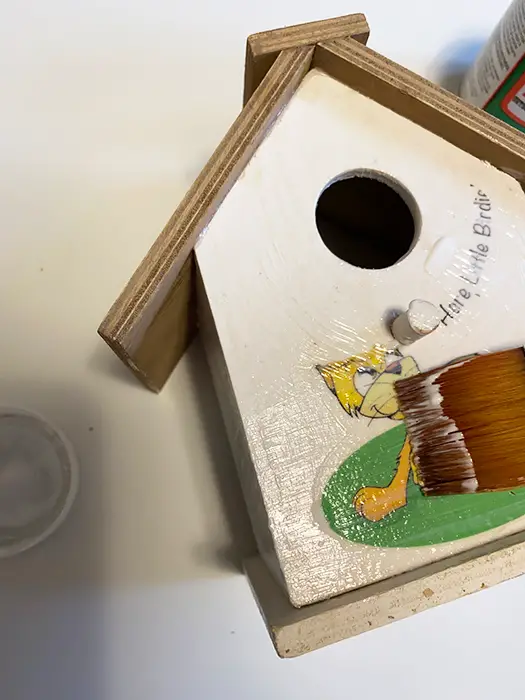
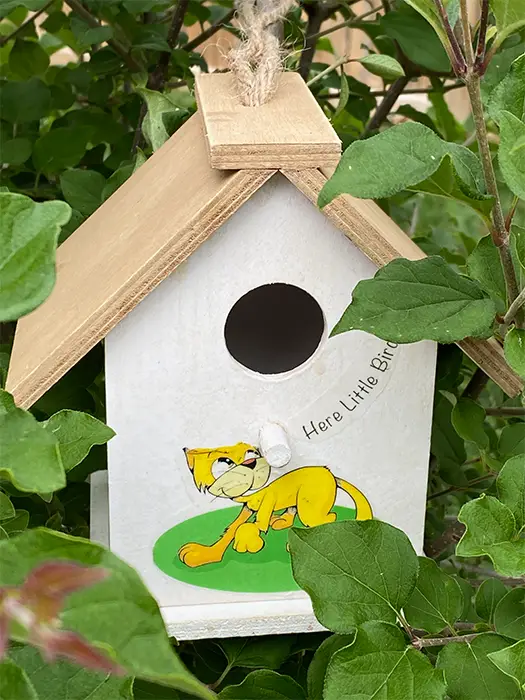
I chose to use a design on a small birdhouse using clear waterslide paper on a white-painted wood surface. Feel free to download the images from our resource library. A link is available in the instructions.
Choosing waterslide paper
The current options for waterslide paper are white waterslide paper and clear waterslide paper.
The clear waterslide paper has a transparent background. The printed decal on the transparent background will blend into the surface of your finished item.
Using white waterside paper is useful if applied to a dark object, such as a wine bottle, dark-coloured canister or mug. When applying the waterslide to a dark background, the colours and the design on the clear paper tend to disappear.
Keep in mind that the white background of the white waterslide paper will show up on a dark surface. If you have a cutting machine, you can easily remove some of the backgrounds, resulting in less white showing up on your finished item. A good thing to keep in mind if you have chosen dark wood.
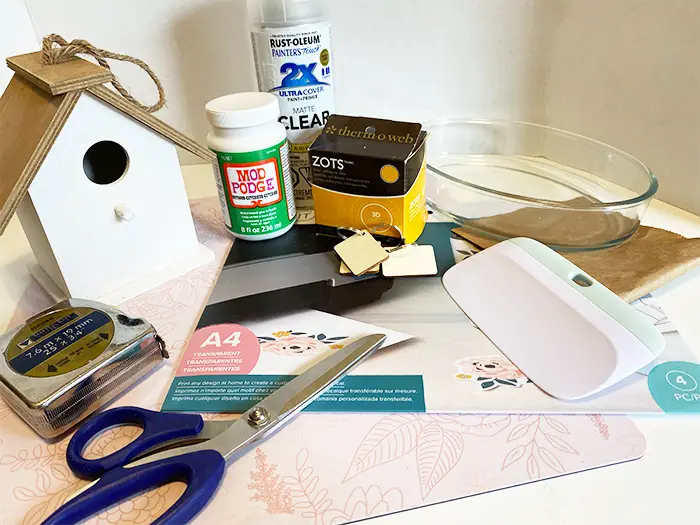
Supplies List
This website contains affiliate links. As an Amazon affiliate, I earn a small commission from qualifying purchases (at no cost to you).
- Waterslide Paper
- wood items – Birdhouse
- printer
- cardboard box
- clear acrylic sealer
- Mod Podge
- fine-grit sandpaper (or craft paper)
- dish (bigger than your design)
- squeegee or plastic card.
- cutting machine or scissors
- hairdryer (optional sealing method – depending on final use)
Supplies list for using a cutting machine
Steps to Use Waterslide Paper on Wood
Clean your wood surface
Make sure that the surface of the wood has no blemishes, burrs or raised areas that interfere with the smooth surface. With fine-grit sandpaper, remove any spots that were previously mentioned. For rounded edges and corners, a super-fine grit sanding sponge works great.
Once any areas of concern (mentioned above) have been removed, make sure the surface is clean and dry.
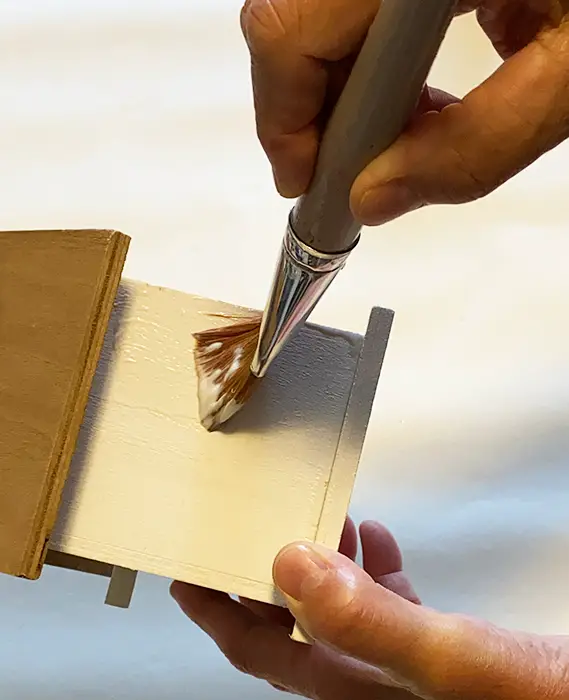
Apply paint if desired
If you wish to have a coloured background on your design, apply your paint until the surface is the desired opacity. Keep in mind that using a dark colour may interfere with the visibility of your finished waterslide paper decal. If using paint, a personal favourite of mine is acrylic art paints, such as Plaid, Apple Barrel or Americana.
In my project, I used Americana White paint.
Allow the surface to dry completely before moving on.
Do not apply waterslide paper directly onto painted surfaces. Be sure you don’t skip the sealing step. This step creates a smooth surface for the waterslide paper to slide onto.
Buff/Sand with Craft Paper
Craft paper or paper from a brown paper bag works very well here. I use it on the surface of the paint. in a sanding motion. You will feel the surface become smooth.
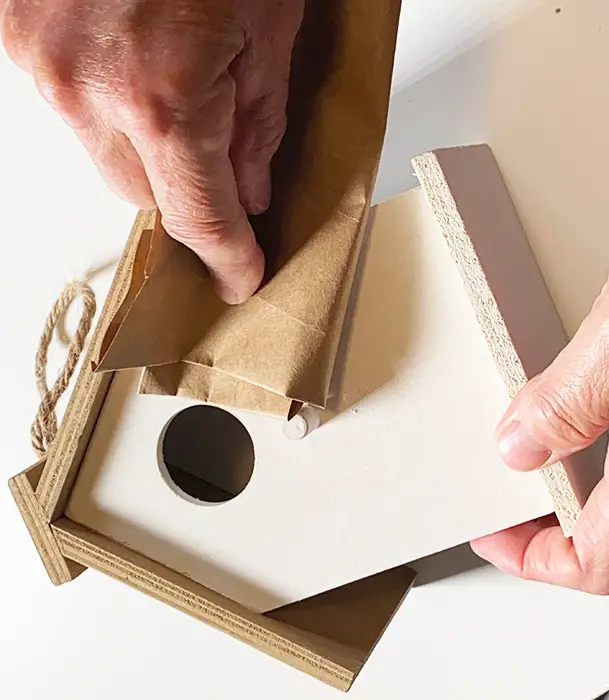
Be gentle, we are only smoothing out the paint surface. We don’t want to remove any paint. You should be able to feel the difference with your fingers.
Remove any dust from the surface. For this, I sometimes use a tack cloth, but other times I just blow it off outside. It depends on the piece I am working on and whether I am inside or outside.
Apply 2 coats of Mod Podge
If your finished piece is going to be exposed to the outdoors, be sure to choose Mod Podge for the outdoors.
Allow the piece to dry fully in between coats.
Your wood surface should now be smooth, which will be compatible with the waterslide paper.
Prepare your waterslide paper design
Upload your design into whatever program you are using to edit your image. I use both Photoshop and Cricut Design Space.
Resize your image to fit your wood item.
For non-Cricut users – Skip the next few steps
Print and cut – For Cricut Users
Upload the design into the Cricut Design Space
Choose “Complex”
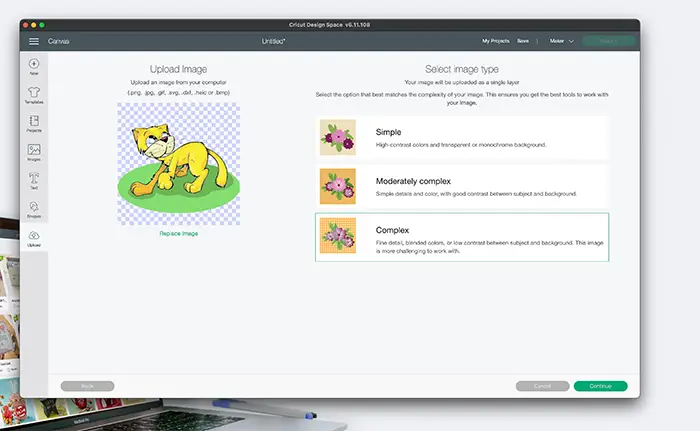
Load the image onto the design space canvas
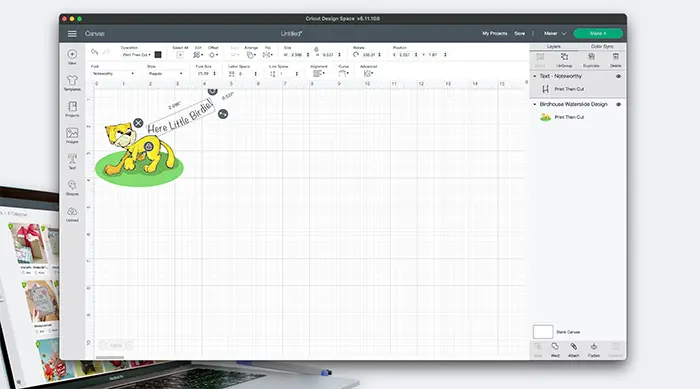
Resize to fit and add any text or other custom details.
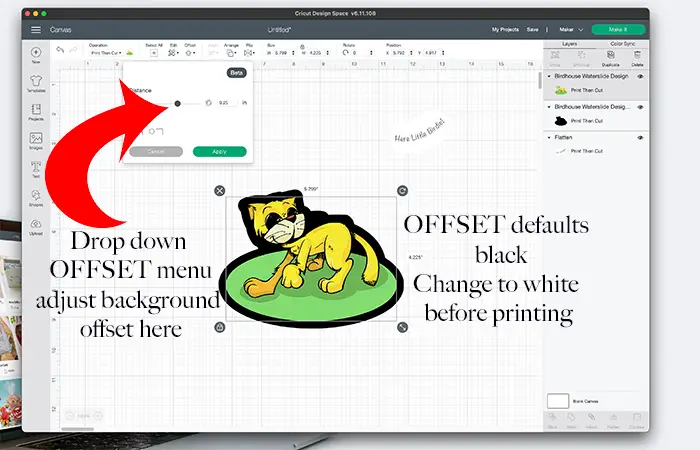
Add Offset
Use the OFFSET option. Select your design and click on OFFSET on the top menu. Note –In Design space, the default colour is black. Be sure to change it to white before printing.
Adjust the size of the offset using the toggle on the drop-down offset menu.
Flatten your design
After flattening, you will see all the layers are now one, print and cut design
Add font
The font is optional if desired (mine says “Here Little Birdie!” Don’t forget to add an offset to the font as well.
The Font used in this project was “NOTEWORTHY.”
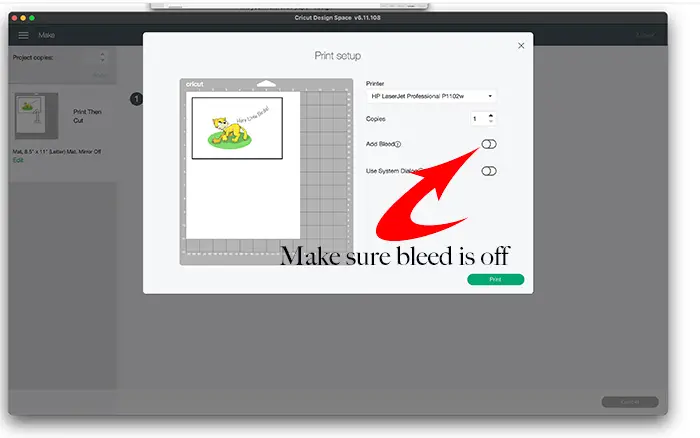
Select “Make “
You will be prompted to select your printer and print.
Make sure when you print that you have bleed turned off. Waterslide paper works best with the bleed turned off. If you print your design and it appears to have smudges around the edges of the font, that means that the bleed was on.
Bleed is an extra bit of ink all around the edges of your design. It is intended to prevent white edges around your design. It is not generally an issue, but it can cause an image or font to look blurry on waterslide paper.
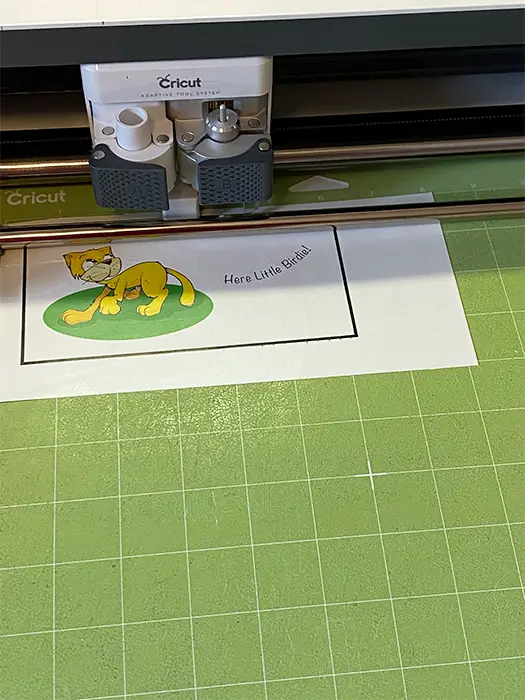
Cut the Design
Adhere your printed design to a standard-grip cutting mat
Select materials – I always choose ” Printable sticker paper ” and ” More” pressure when using waterslide paper with my cutting machine”
NOTE _ When adhering the waterslide paper to your Cricut mat, make sure the bounding box is completely squared up on the grid of the mat. If the box is on the cutting mat crooked or askew, your Cricut will not cut it properly or may not be able to register the edges of the box.
When the design has been cut, remove it from your cutting mat. Weed as usual (if your design requires weeding)
Printing your waterslide paper design (all users)
Follow product instructions and make sure the paper is loaded properly in your printer. Only one side of the paper is compatible with the waterslide process. The side of the waterslide paper that has a film on it will be compatible with the printing process.
Some waterslide paper is a little smaller than the normal 8.5 by 11 paper. You may need to adjust the arms on your printer to make sure that the paper feed on your printer fits the paper. This will ensure that the paper feeds straight into the printer.
If your paper feeds incorrectly and prints the design crooked, it is not a problem, unless you are using a cutting machine. When using a cutting machine, the design must be mounted on the cutting mat squarely for the machine to read the bounding box. Trim accordingly.
Waterslide paper is available for both laser printers and inkjet printers. Make sure you have purchased the compatible paper for your printer.
Using waterslide paper with a printer and scissors
Size your design in your editing software or on your document before printing.
Select your printer and print. ** If your program allows you to select bleed or no-bleed, please select no-bleed. Be sure to load the waterslide paper properly. (Print on the shiny side of the paper)
After printing, allow a few minutes to dry.
if your piece of waterslide paper can be used for more designs, trim the paper with a paper trimmer/ This will keep a nice smooth edge for feeding into your printer the next time you use waterslide paper.
Cut around your design and save the leftover paper for another project.
Tip – If you are uncertain about how your image will look and what size it should be, the solution is to print a draft on paper and trim it and check it on your object for fit. There is no need to print it in colour as you are only printing to check for sizing. ( I do this for every design)


Download the free design used in this tutorial from our free resource library.
Get the design used in this tutorial
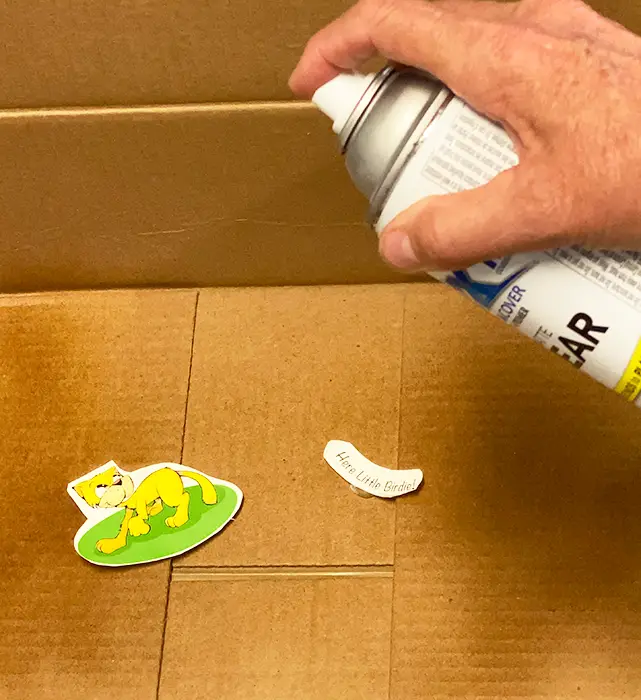
Sealing your waterslide paper design
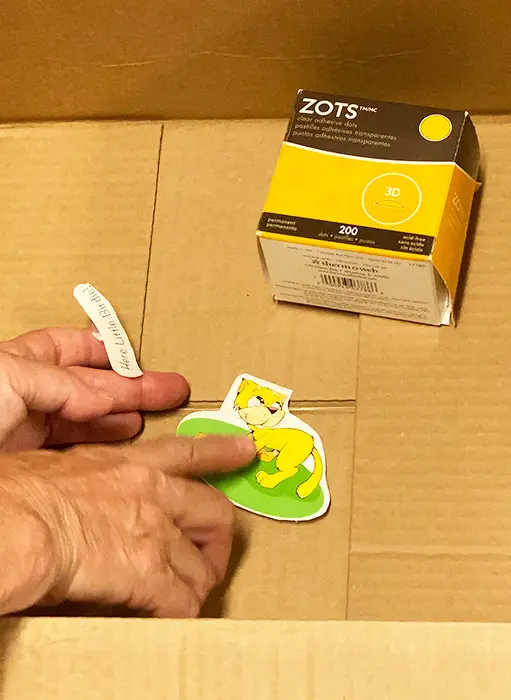
In a well-ventilated area, place your design into your cardboard box (mock spray booth) If possible, it is best to do this step outdoors.
Using a Zot removable adhesive dot, lightly secure your design to the bottom of your cardboard box.
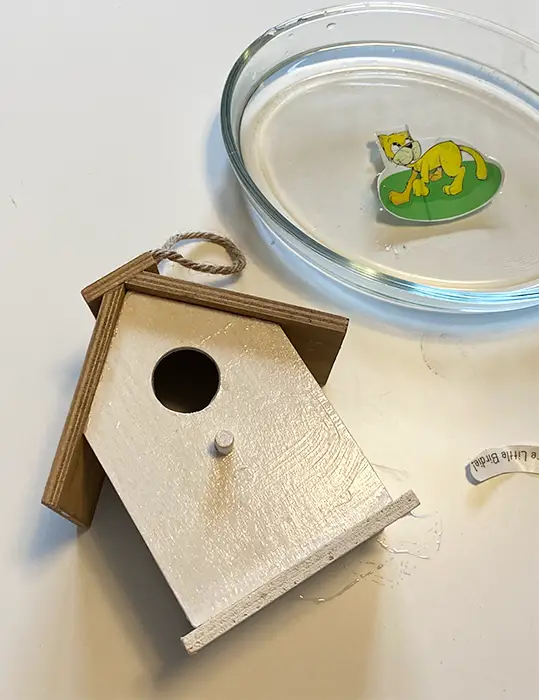
Prepare the water bath
In a bowl or dish large enough for your design, fill it with enough warm water to submerge your design. Warm or room-temperature water works well. Cold or Hot water is not recommended. The purpose of the warm water is to activate the later/film, making it easy to slide off the paper backing.
Soak Your Design
Soak your design (one at a time) in the warm water. Soak according to product recommendations. Usually, the recommended soaking time is about 30 to 60 seconds.
Soaking the Waterslide Paper loosens the sealed design from the backing paper.
Apply your decal to the wood surface
Before removing it from the water, test the decal to see if it is released from the backing. If you feel it slide a little, then it is ready to apply to your surface. If it doesn’t slide easily, put it back in the water for a few more seconds and then try again.
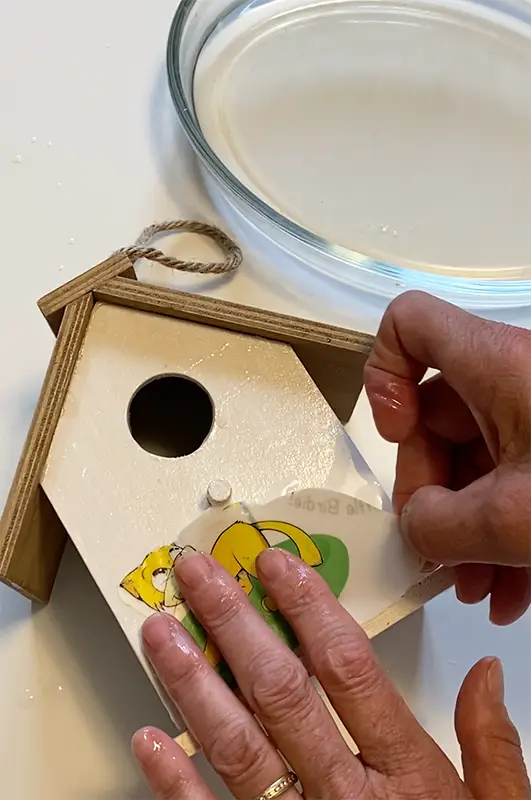
When applying, place a finger on the top layer of the decal and carefully slide out the backing. Since the decal is still fairly wet, it should slide out easily. Take your time, as the decals can tear easily.
Seal the design on the surface
Once your design is fully dry. Apply 2 coats of Mod Podge sealer onto your design. Let the coats dry completely in in-between applications. If you are using your completed design (such as a birdhouse) outside, be sure to use the outdoor Modge Podge sealant.
Using a hairdryer to seal
If your completed wood project is not going to be exposed to the outdoors, you can seal it using bursts of heat from a hairdryer. Do not make it too hot, and do not hold it in one place.
Too much heat can make the waterslide paper bubble or burn. Wave the hairdryer back and forth across the design for about 30 seconds. The design sealed using a hairdryer is not waterproof and should not be allowed to get wet.
Let dry and enjoy!

Disclaimer: This post contains affiliate links. We receive a small commission when purchases are made through our links. Thank you for your support.