

Content Created by Tracey of Baker Street Living 
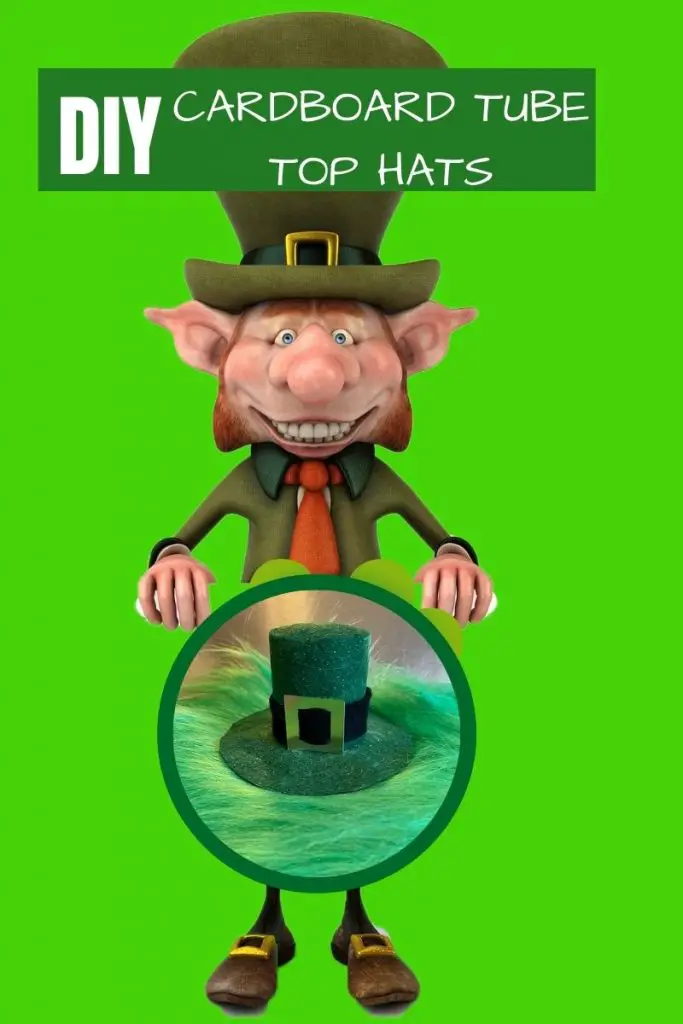
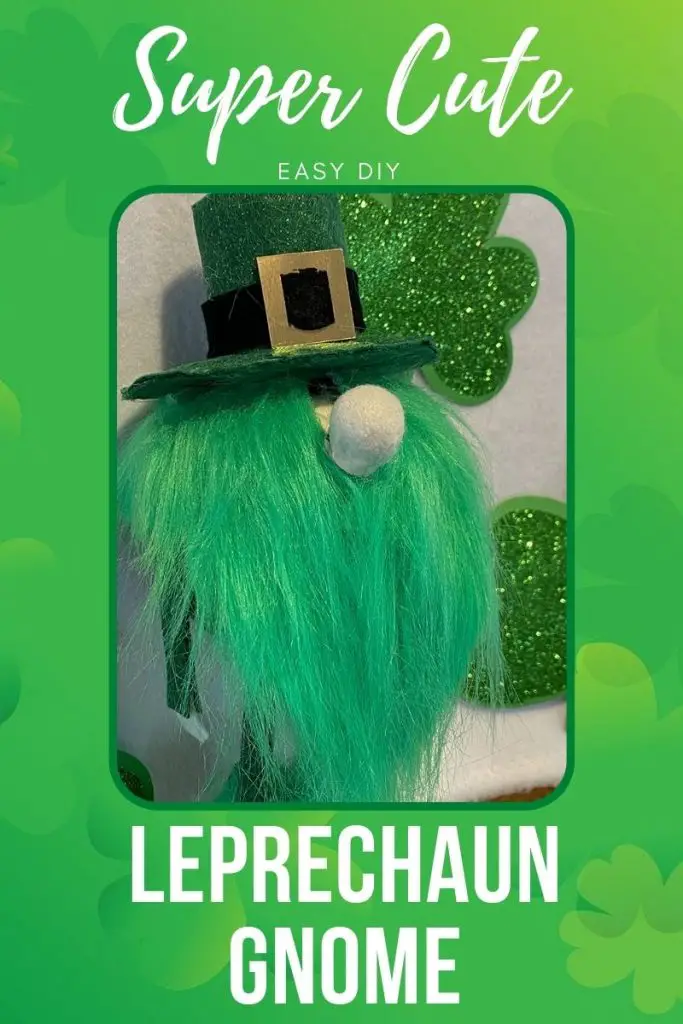
Who doesn’t love the whimsy that Gnomes bring to holiday decorating? Our easy DIY Leprechaun Gnome is a perfect project for St.Patrick’s Day. Add this cute DIY Leprechaun Gnome to your leprechaun trap display for everyone to see on St. Paddy’s day. Don’t forget to make our Cardboard Tube Top Hat for your leprechaun Gnome.
If you have already seen or made our Long Legged Christmas Standing Gnome, and our Recycled Cardboard tube Gnome Boots you will already have an idea of how we are going to assemble our Gnome. Our Leprechaun gnome is similar, but there are a few minor differences.

If you want to make a larger Leprechaun Gnome than the one in this tutorial, just increase the sizes of all the supplies. Our Long Legged Gnome is 22 inches tall when completed, so if you want a big fella, use the supply dimensions from that post.
Supplies List
This website contains affiliate links. As an Amazon affiliate, I earn a small commission from qualifying purchases (at no cost to you).
- Smooth 4-inch styrofoam ball
- sock – green or shamrock design
- faux fur – for beard ( 8 by 12 inch square)
- small wooden ball or pom pom
- 5-inch square of coloured felt.
- small black beads or safety eyes
- 2-inch styrofoam egg
- 2 pencil crayons (or wood dowels)
- cardboard tube leprechaun hat
- green glitter felt – for boots
- gold trim (optional) for boots
- small elastic band
- 4-inch square of black sheet foam
- gold shiny cardstock – small piece for shoe buckles and hat buckle (only use if making buckles)
- small zip tie
- modelling clay – optional (for shoe weights)
- green embroidery floss (only required if adding laces)
Craft room tools
- Scissors or
- Cricut cutting machine
- tacky glue or hot glue gun
- fabric fusion glue
- X-Acto knife
- tweezers. (long handled craft tweezers work great)
- darning needle (if adding laces instead of a buckle)
Choosing a Styrofoam ball
There are different types of styrofoam balls. There is floral foam. smooth styrofoam and porous styrofoam balls.
For this project, I recommend you choose a smooth styrofoam ball.
The floral foam is too soft and tends to dent easily when handling.
The porous styrofoam ball tends to melt when it comes into contact with hot glue. If you are using one of these, use tacky glue or add a thin layer of quilt batting around the ball.
Choosing Socks for your DIY Leprechaun Gnome
There are a couple of things worth noting when choosing the socks. Thin nylon socks will tend to be somewhat see-through when you stretch them over the styrofoam ball. A closely-knit sock will be more opaque and result in a better-finished leprechaun. If you have a thin sock that you want to use and it is too see-through, put a dark sock under it to cover the white styrofoam ball
A sock with a lot of patterns or stripes can also look a bit off when completed. The pattern will stretch and may not give you the desired look when completed. A pattern that needs to be straight can also be difficult to use, as you will need to ensure that it does not end up crooked.
Make sure that there is no defined heel in the sock. A consistent colour or pattern will cover the ball nicely, and many socks have a different colour heel, or the weave is different, and it can look funny on the gnome.


How to Make a Leprechaun Gnome
Cut fabric pieces
The printable pattern and the SVG cut pattern are available in our free resource library.
For Cricut Users – Steps to “Make”
For Cricut users, you will need a Maker, a Maker 3 or 4 if you are cutting fabric, such as felt. If you do not have a Maker or Maker 3 or 4, check the materials list for your cutting machine and choose a compatible material for the shoes and arms.
- Download the pattern from our free resource library onto your computer.
- Upload the pattern into Cricut Design Space.
- Select “Ungroup” from the layers menu on the top right corner of the canvas.
- Duplicate pieces (side panels, toe and tongue, arms, hands) to cut the number needed (listed below)
- If you are not using buckles, and you prefer to add lace-up shoes, hide the buckles from the canvas by clicking with your mouse on the eye next to the buckle image in the layers panel on the right side of the canvas.
- Make sure that if you have resized the pieces, they fit your styrofoam egg (shoe) and the arms are long enough.
- Select Make It
- Install the rotary blade for the felt fabric and the fine-point blade for foam and cardstock.
- When choosing pressure, select “More”.
- Choose your materials from the drop-down menu on the Make It screen.
- Press the flashing Cricut light on your cutting machine.
- When removing the cut buckles from the cutting mat, use a Cricut spatula to gently lift them from the surface.
For Printable Pattern
- Download the printable pattern.
- Print the pattern.
- Check for fit on your styrofoam egg (shoe) before cutting the pieces. If needed, adjust sizes accordingly.
- Cut the number of pieces listed below.
- When cutting buckles, it will be easier to use an X-Acto knife to cut the small pieces.
Cut shoe pieces for 2 shoes
- 2 side panels (green glitter felt)
- 2 toe and tongue pieces (green glitter felt)
- 4 soles – black foam sheet – place your sliced egg half onto a piece of paper. Trace around the egg and use as a pattern to cut your foam pieces. The extra two can be adhered at the end to cover any glue or imperfections.
- 2 small shoe buckles – gold cardstock or glitter felt (optional)
Cut Body pieces
- 4 arm pieces
- 2 mittens
Cut faux fur
Cut the beard piece and the pieces for the shoe tops.
BEARD – For a 4-inch styrofoam ball leprechaun gnome, cut a triangle of faux fur that is 5 inches wide and 8 inches long. If you want a longer or shorter beard, adjust accordingly.
You can also add faux fur around the ball for hair (as in our image), but this is optional. Measure the circumference around thre body of the Gnome and cut enough fur to wrap around the ball and the desired length. ( I used 2 inches as my length for the hair)
For the SHOE TOPS, cut faux fur pieces that are 1 inch by 2 inches. This piece will be used to wrap around the top of the shoe/ bottom of the legs. It will fill in the top of the shoe.
Make the Leprechaun Gnome shoes.
Download the free printable pattern or the free SVG cut file for the shoes and arms from our resource library.
Downloadable Pattern for DIY Leprechaun Gnome
Cut the foam sole piece and the felt side and tongue pieces. Cut buckles if desired. (follow cutting instructions above)
Cut the styrofoam egg in half lengthwise.
Using hot glue (or tacky glue), adhere one black sheet foam sole piece to the bottom of each cut styrofoam egg. (Which glue you use is a matter of preference. If your styrofoam ball melts with the hot glue, switch to a low-temp hot glue or a tacky glue.
Using the pencil (a great way to recycle) or wood dowel, make a hole in the egg, where the leg will be inserted.
Using glue, attach the tongue piece of cut felt to the egg-shaped foam.
Run a bead of glue around the sides of the shoes and up the back (about 1/4 of an inch). Attach side pieces of felt to the shoe (be sure to center the back shoe flap on the back of the shoe… If using tacky glue, you may need to hold the felt in place with an elastic band while the glue dries. If the felt doesn’t line up perfectly, fold it under and adhere to the sole or trim. (This is why we have extra sole pieces)
Run a bead of glue all around the bottom of the shoe. Adhere the gold ribbon around the bottom of the shoe. Make the ribbon ends meet on the back of the shoe. Trim off any excess.
Using a darning needle and embroidery thread, insert laces on each shoe or attach the buckle (pattern provided) to the front of the shoe (if desired)
Glue the extra sole pieces of foam to the bottom of the shoe. This isn’t necessary if the bottom is clean, but if you have any glue that ran onto the sole, this is a good way to cover it up, for a nice, clean finished shoe.
Set the shoes aside and allow them to dry fully, while you construct the rest of the Leprechaun Gnome
Make the Nose
Place the wood ball in the center of the flesh-coloured felt. Pull the felt up around the nose and secure it with an elastic band.
Trim off some of the excess, making sure you have a triangular piece for the eyes to adhere to.
Construct the Arms
Using fabric fusion glue or hot glue, attach the mitten to the end of one arm piece.
Attach the other arm piece on top of the other arm piece and hand.
Repeat for the second arm.
Allow to dry.
Prepare the Body
Using the sharpened pencils or wood dowels, push leg holes into the styrofoam ball.
Insert the styrofoam ball into the sock. Center it so that the toe seam is on the underside of the body and the pattern is straight. Make sure that the leg holes in the styrofoam ball are on the bottom of the sock, in the correct position.
Pull the sock tightly and secure it with a zip tie.
Trim away the excess sock from the top of the body.
Attach the nose
Glue the nose piece to the body, placing it on the upper portion of the ball (see image). Leave a piece of the nose felt exposed above the nose, for the placement of the eyes.
Attach beard and hair.
Cut a small notch from the top of the beard (for the nose)
Glue the beard in place, with the notched-out area surrounding the nose.
Attach the eyes
Place a dot of glue onto the eye area, above the nose. Place the eye beads in place. (tweezers can. help you get a more precise placement)
Allow the eyes to dry completely before moving on.
Add Leprechaun Top Hat
I am using my Leprechaun Top Hat, made from cardboard tubes. If you would rather make a traditional, triangular hat, directions can be found on our Long-Legged standing Gnome tutorial.
Attach the Legs
Using an X-Acto knife, cut two small slits in the sock on the underside of the body, where the leg holes are. If the sock begins to run, hold them in place and use hot glue or fabric glue to stop the running.
Fill each leg hole with some glue and insert the legs.
Allow to dry
Attach Shoes.
Add fur for the shoe tops: Run a bead of glue along one edge of the fur for the boots. Attach the fur about one inch from the bottom of the legs. Layer if desired for a fuller shoe top.
Fill the holes in the styrofoam egg/shoes with glue and insert the legs.
If your leprechaun Gnome needs some weight added to the shoes, to help it stand up straight, add a small amount of modelling clay around the base of the legs
Show off your DIY Leprechaun Gnome
We hope you enjoyed our Leprechaun Gnome Tutorial. Make your own, he is super cute and adds some whimsy to your St. Patrick’s day decorations.

This website contains affiliate links. As an Amazon affiliate, I earn a small commission from qualifying purchases (at no cost to you).