
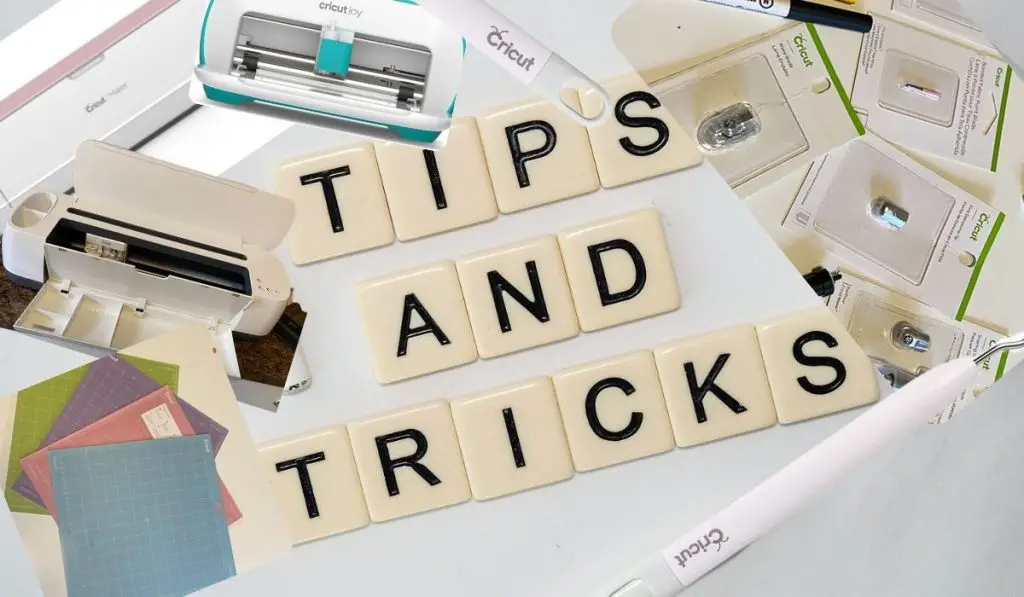
My Cricut Cutting machines are among my most cherished craft room possessions, if not my number one favourite machine. Choosing which Cricut cutting machine is right for you can be daunting, but once you have it, there are some great Cricut tips for beginners that are extremely helpful in using your Cricut Cutting Machine. Learning how to use your Cricut cutting machine doesn’t have to be intimidating.
I have learned these Cricut tips over the years by trial and error and from fellow crafters. From Cleaning your Cricut mats and making them sticky again, to choosing the right Cricut tools, there is a lot to learn.
This Cricut Tips for Beginners guide will help you save money (less wasted materials) and time. That just leaves more time for crafting. There are so many great crafts you can do with a Cricut Cutting machine, why spend your time, frustrated and figuring out the little stuff.
Cricut Tips for beginners and every crafter
Cricut Design Space Vs Cricut Access?
Cricut Design Space is the canvas on which you will build and edit your projects. You MUST use design space with your Cricut machines. There is no cost to use Cricut Design Space, but it is not the same as Cricut Access. Design Space is a template or canvas that you will use to design and save your projects. You will create or upload files into Cricut Design Space.
Cricut Access is a library of projects, fonts, and images that you can choose from. Cricut Access is free for one month with the purchase and registration of a new machine, but there is a monthly subscription fee to use it after your month runs out. There are 2 subscription options for using Cricut Access, one is a monthly fee (9.99$ USD per month) and the other is the Cricut Access Premium, which is a once-yearly payment of 119.88$ USD (no monthly option)
Many licensed designs, such as Star Wars, Harry Potter and Disney (and many more) are available in Cricut Access, but there is an added cost to download.
Cricut Access does offer a limited number of free projects. Grab them when you see them because they are time-sensitive and get removed weekly.
The difference between standard and premium is discounts on Cricut products and shipping fees.
For further details on Cricut, Access click HERE.
This website contains affiliate links. As an Amazon affiliate, I earn a small commission from qualifying purchases (at no cost to you).
What should you do when you first start using your Cricut?
Once you get your machine connected to Cricut Design Space (a couple of easy steps), navigate Design Space. Choose a couple of shapes and just cut them to familiarize yourself with how that machine works. Select the Beginner projects from the Design Space Beginner section – mentioned below. Check outCricut.learn.com. This is an excellent starting spot and gives free access to videos directly from Cricut.
Make your own designs to use in Cricut Design Space.
You do not need Cricut Access to use Cricut Design Space. It is completely optional. There are other programs that you can use to design cut files, such as Adobe Illustrator or Inkscape. Adobe Illustrator is a paid program, and Inkscape is a free open-source software.
INKSCAPEis very easy to use and is very popular with Cricut users. I have used Inkscape many times, and it is an easy-to-learn,n fantastic program. Inkscape can lag on an iMac, so I usually use it on my PC instead, as it works faster.
Some will recommend “Sure Cuts a lot” and “Make the Cut“, which are both online design programs. Make the cut, no longer supports Cricut and “sure cuts a lot only allows the upload of SVGs. Inkscape is the best free program for creating your own designs, as it allows for SVGs and PNGs.
Check out Inkscape HERE
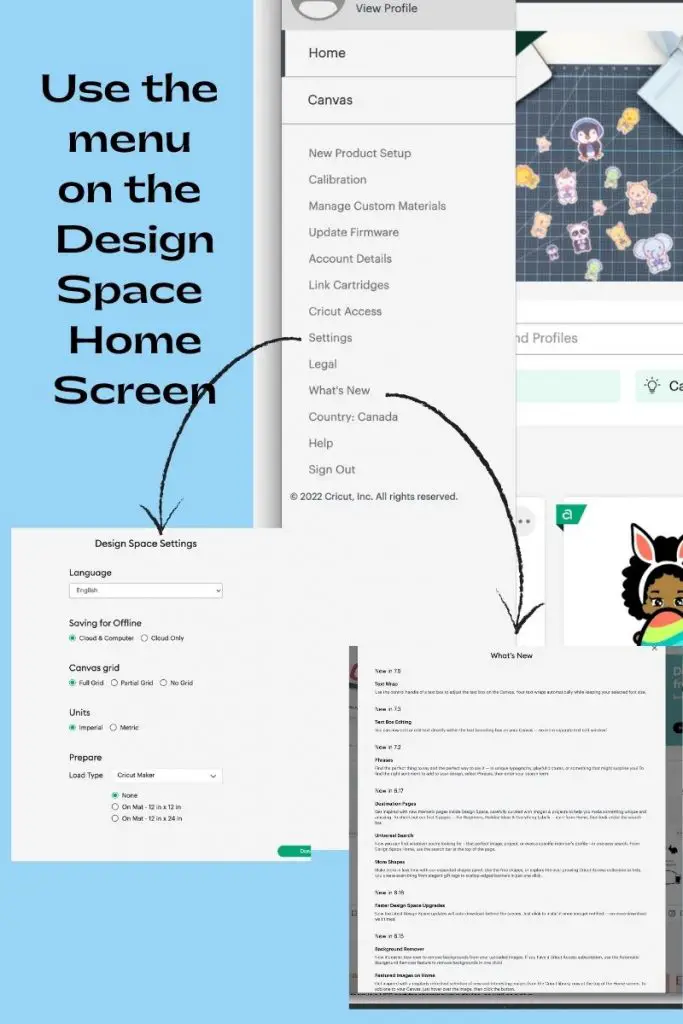
Use the menu in Cricut Design Space
When you first open Cricut Design Space, you will see a hamburger menu in the top left corner next to “Home”. This is easily overlooked. This is where you will find calibration, your settings, Cricut Access, account information, what’s new and more. Whenever you do an update it is a good idea to look at what’s new. When you open it, you will get a pop-up that tells you everything new in the recent updates. If you don’t check it after an update, you can get a surprise when you are working in Design Space, and something has changed.
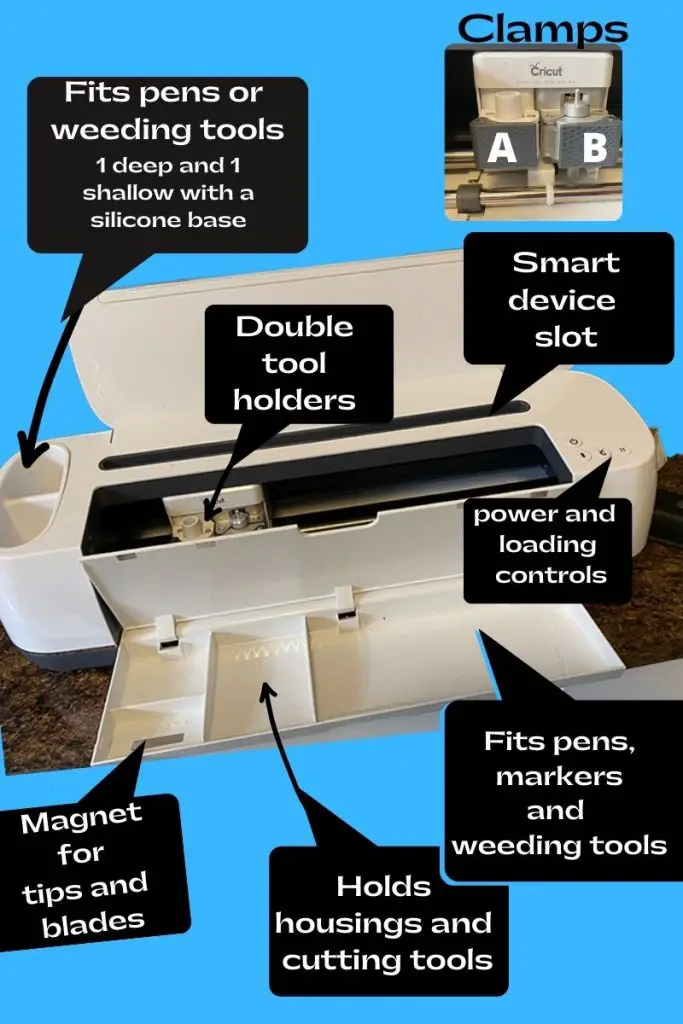
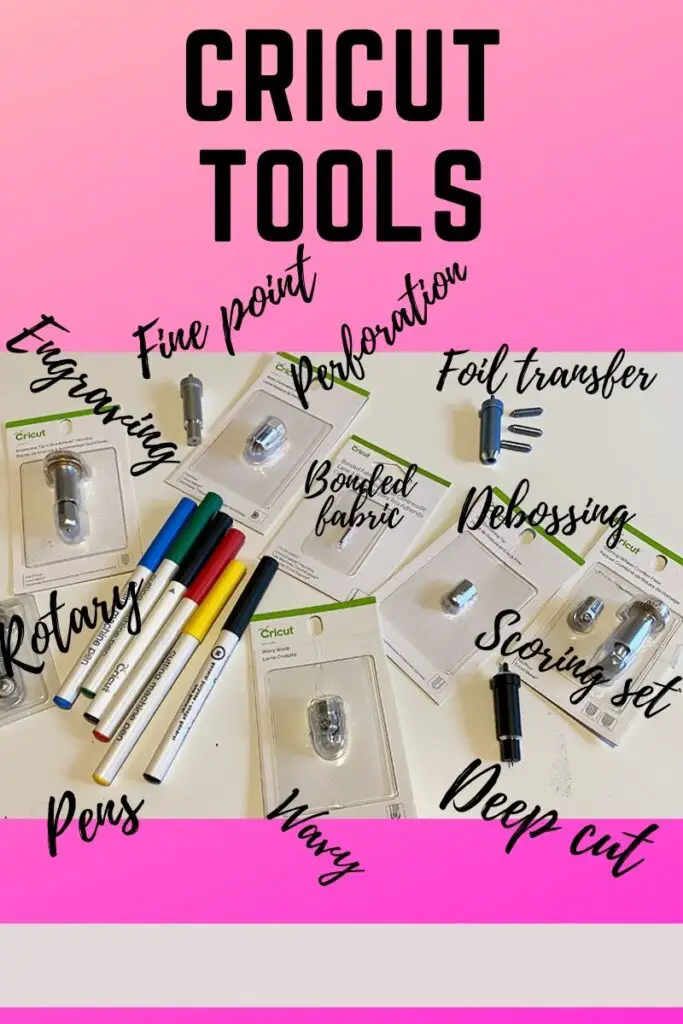
Cricut machine – what are all these parts?
When you first unbox your new Cricut cutting machine, you will see several compartments and slots. Getting to know your machine before you start is a great help. A manual will come with your Cricut cutting machine, along with a sample of materials to do test cuts.
In addition to the image below, there is a USB port for charging your device, as well as a plug that allows you to directly connect with your computer. This can be helpful if you have wifi issues and interruptions.
Buying old Cricut Cutting Machines
If you are reading this, you probably already have a Cutting Cutting Machine, but if you are still shopping around for a cutting machine, there are a couple of things you should know. Not all Cricut machines do the same; learn about what options each machine has.
Old Cricut machines, such as the Cricut Expression, use cartridges. Those machines are not compatible with Cricut’s Design Space. You are limited in the sizes you can make of the projects, as well as the materials you can cut.
If you have old Cricut machines and have upgraded to new machines, you can link the cartridges that you had purchased. I don’t recommend you purchase old cartridges for this purpose, as I am told that this is being phased out.
You can connect multiple compatible Cricut cutting machines to your Cricut Design Space account. When making a project, you will just choose your machine from the drop-down menu on the Make It page.
Tool organization
Cricut machines have a limited amount of storage. It is great for basic tools, but when you start accumulating tools, pens sets and other accessories, you will need to expand your storage options.
Cricut offers a few storage options, but my favourite products to use for my tools and extras are acrylic makeup, jewellery or office organizers. The clear acrylic is easy to see through and looks great on the shelf.
For Markers and Pens, this acrylic pen holder is fantastic!
For weeding tools, adapters, spare blades, cutting tools and housings, I like this buildable makeup organizer. You can easily purchase new drawer units as you build your tool and accessory collection.
Cricut also has atool storage container that holds housings, tips and blades. It is small and compact, and is also a great way to store your cutting tools.
The amount of tool storage is also dependent on your machine. My preferred machines are the Cricut Maker and the Maker3, simply because of the versatility, but if you are using an Explore Air or a Cricut Joy, you will have fewer tools, and therefore you need less storage.
As mentioned, there are tool compartments that are part of your Cricut cutting machine, but if you are like me, you have assembled a decent tool collection. (OK, it’s huge! I confess, you will need additional storage organization options.

Storing Cricut pens and markers
The best way to store your Cricut pens is tip-down. This allows for the easy flow of the ink to the tip. This is especially important when you are writing with your Cricut. The Cricut has no way of knowing that the ink is at the tip and ready to roll. Always try the pen on a scrap piece of paper before you start using it, especially if it has been sitting.
Storing your Cricut pens tip-down also prevents the tip from drying out, as well as the ink. It eliminates the air pocket between the tip and the ink
Storing Markers: Cricut infusible ink markers and most markers can be stored tip down, but some should be stored horizontally. Markers that are Alcohol ink markers should be stored horizontally. Always read the package instructions and store according to the manufacturer’s recommendations.
Using Non-Cricut Pens and Markers
Get more options for your drawing projects by purchasing pen adapters. The adapters will allow you to use Sharpies, Crayola markers, fine point BIC pens, gelly pens and even some chalk markers.
Writing with Cricut.
Many of everyone’s favourite fonts are not designed for writing. Many fonts are designed to be cut, and when you change them to writing, you will see that you just get an outline. That is fine if you don’t mind spending the time colouring them in or you are making colouring pages, but most of the time, you want a font that is solid and designed specifically for writing.
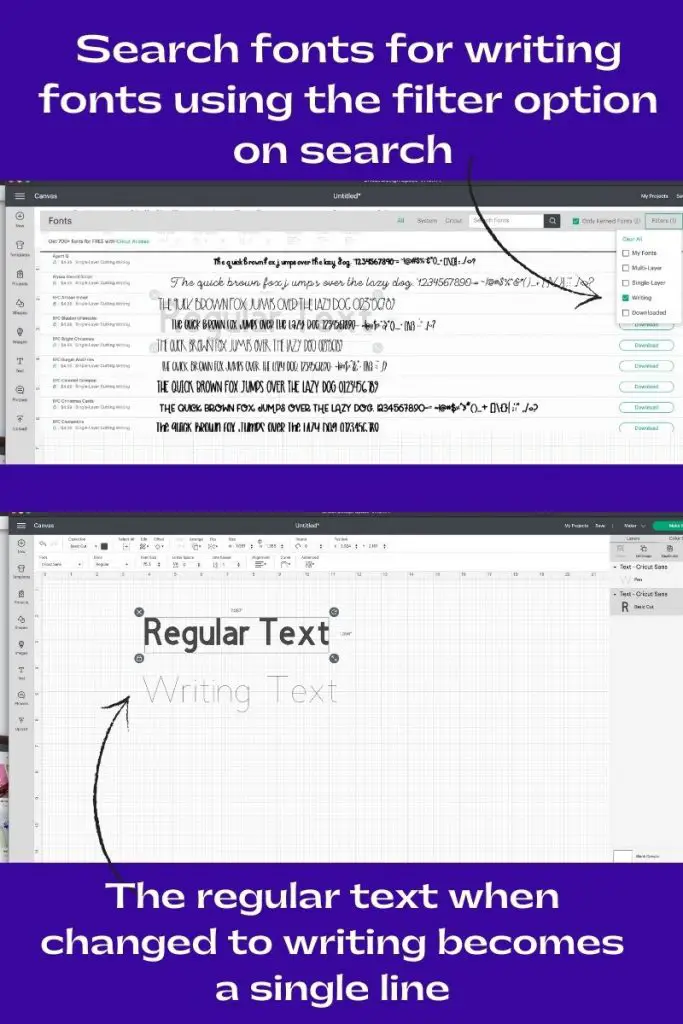
Fonts on Cricut
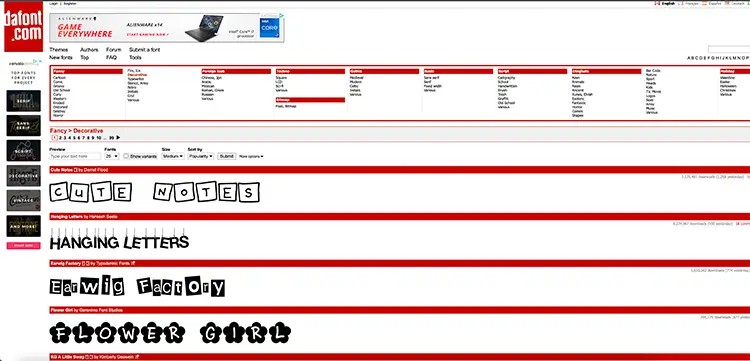
If you have Cricut Access, you are free to use most fonts. If you don’t have Cricut Access, you will be prompted to purchase fonts that are not already downloaded onto your computer. There are a ton of free fonts available online. One of my favourite places to get free fonts is DAFONT.COM. and FONTBUNDLES.COM. Both sites offer paid options for commercial-use fonts.

When downloading fonts onto your computer, they will show up when you select “SYSTEM FONTS” on the font menu along the top of the screen. If you have downloaded a font onto your computer while using Cricut Design Space, you will need to save your project and close Cricut Design Space and then reopen it, so that the new font will show up on the list of system fonts.
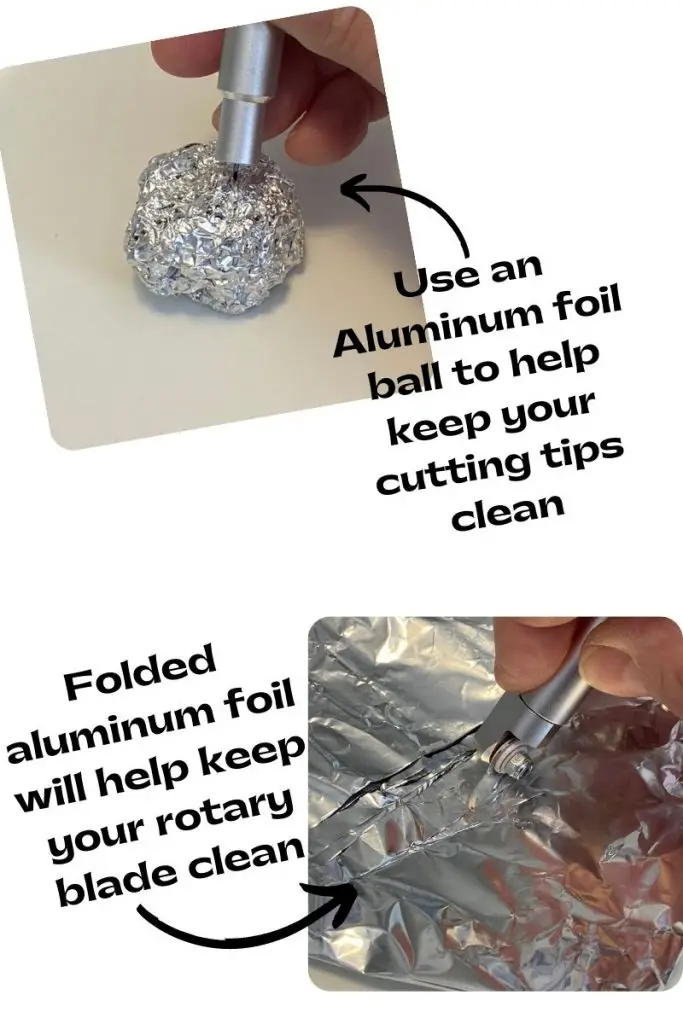
Keep your blades clean.
Cutting adhesive vinyl, HTV felts, and other materials can leave residue on your cutting tools. There are a couple of easy ways to keep your cutting tools clean. Keeping your cutting tools clean will mean better cuts and less wasted materials.
Aluminum foil Ball: Poke your blade into a tin foil ball about 30 times. The tin foil will remove any debris on the blade.
Rubbing Alcohol: Using a lint-free cloth and some rubbing alcohol, wipe off the blades and tips. Doing this will remove any dust and residue that can’t be seen.
For Rotary Blades: fold a piece of tinfoil into a square, about 4 layers thick. Run the blade back and forth over the foil.
Save Often
Always save your projects, even while you are working on them, and they are not complete. Every time you save a project, you will be prompted to either “save” or “save as”. When you select “save”, the original will be saved with the new version. If you choose “save as” you will give it a new title, and it will make a new project. You will then have an original and a new version in your project file.
Saving frequently will ensure you don’t lose work. A simple reason might be a wifi outage. If your wifi is spotty or you have an unexpected computer issue, you will lose your work. Saving saves time and frustrations over lost work.
Saving for Off-Line
You can save your work offline. That means that you save to the cloud and your computer. You can work on them and even cut them while offline. For example, you are going camping and want to work on designs but don’t have internet. You can save offline and work on them without being connected to the internet.
You can not use purchases from Cricut Access offline. You also must sign into Cricut Design Space with an internet connection and then you can disconnect the internet and work offline. To use the camping example, you are at a campground with spotty internet. You go to their office or cafe to log in and then disconnect the wifi and return to your RV with your laptop and continue working In Design Space. Don’t forget to save your project.
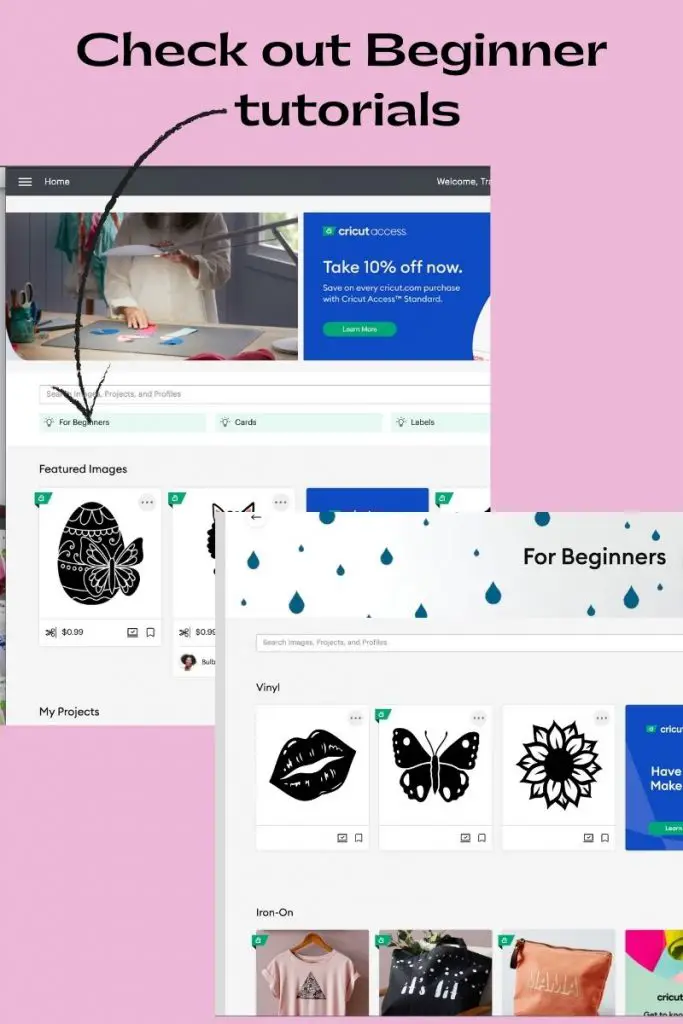
Check out Beginner Projects and Tutorials
Cricut Design Space has a beginner hub that is a great place to get information and inspiration. You will find beginner projects for vinyl, HTV, invisible ink and more. If you are not a Cricut Access member, you can find free projects by entering”FREE” in the search menu.
Check out Cricut Learn. This is a fantastic library of videos and tutorials by Cricut.
The best way to remove materials from your mat
Pull the mat away from your cardstock or vinyl. This technique is the best way to keep your products from curling up. It feels more natural to pull the material off the mat, but you will quickly learn that when you remove your material from the mat, it makes your material curl. Removing the mat from the material is the answer.
Start by loosening a corner of your vinyl or cardstock with the Cricut spatula or weeding tool, and then hold the paper on a flat surface and pull the mat away. Go slowly and use a spatula to loosen materials as needed. (Only use the weeding tool on the pieces to be discarded)

With fabrics, always use a spatula tool and only use the weeding tools on pieces that are going to be discarded, as the sharp tips can leave marks and holes depending on the type of fabric. Fabrics, such as felt or fleece, tend to stretch and lose their shape when pulled from the mat. Always be gentle with fabrics, and always use a fabric grip mat.
Keeping your mats clean
Cutting mats can take a beating and quickly lose their stickiness. It is a good practice to clean off your mat surface between projects.
For quick cleaning, use a lint roller. The lint roller will remove small surface bits and make it ready for your next cut. A lint roller is great for picking up glitter off of your desk surface and mats too.
If the mat has more on its surface and a lint roller isn’t cleaning it well enough, wipe it with a clean cleansing wipe. Do not use cleansing wipes that have added scents and skin softeners, such as lotion.
Another option is to apply a piece of Con-tact paper onto the mat, adhesive side down. Use the scraper tool to ensure it covers the entire surface of the mat (or area needed). Remove the contact paper and discard it. Do not use, strong grip transfer tape, as it can tend to remove too much of the mat’s stickiness.
Always cover your mat when not in use. Using the plastic protective cover will keep dust and dirt from accumulating on the surface. If you have pets, this is crucial! I can’t tell you how many times I have struggled to remove cat hair! If you have lost or damaged the protective cover, you can use the Cricut clear acetate film in place of the cover. . I always keep a few extras on hand so that I am never without one. Don’t forget to wipe the protective film cover occasionally to keep it clean as well.
When cutting mats are past being cleaned or made sticky again, use Painter’s tape to adhere materials to them for cutting.
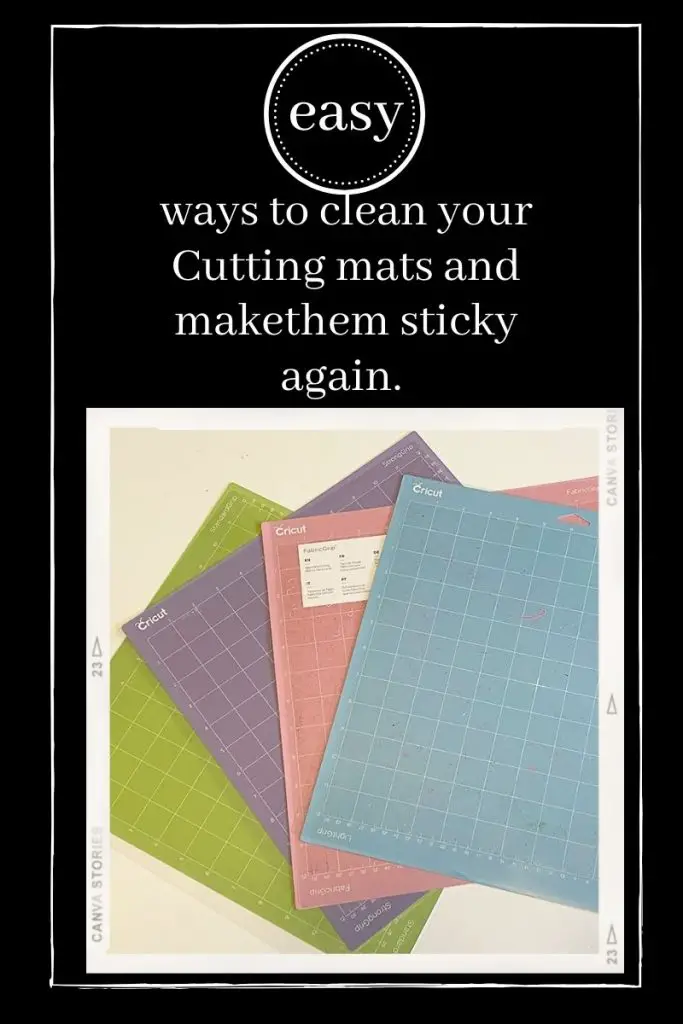
For heavier cleaning, I use Dawn Spray Powerwash. It works like magic on Cricut cutting mats. All you need is a soft brush, Dawn Powerwash Spray and some water. After cleaning, hang them to dry using pant/skirt hangers. Once they are fully dry, replace the protective film. Simple, and easy!
Make your Cutting Mats sticky again
When you find that your mats are losing their stickiness, even after cleaning and drying, you can spray Krylon Easy-Tack onto the mats to add a new layer of stickiness.
To re-stick your mat with Easy Tack:
Clean the mat thoroughly and let it dry completely before spraying on the Easy Tack.
Apply painter’s tape around the edges of the. mat, to cover all areas that you don’t want sticky
In a well-ventilated area, spray a thin coat of Easy Tack onto the mat and let it dry. (Be careful of overspray)
Spray two or three more coats onto the mat, letting it dry in between coats.
Once the mat is lightly sticky (like a regular mat) replace the plastic protective sheet.
Repeat the process as often as needed.
Securing thicker materials to your cutting mat
When cutting materials like chipboard, balsa wood, leather and other heavier-weight materials, add some extra reinforcement to keep materials securely on the mat during cutting.
Apply painter’s tape around the edges of the material and onto the mat. Make sure that you press it down well and make sure it is extra secure before cutting. Even though you will likely be using a strong grip mat, this will help to keep the material securely in place. This is also a good technique to use when using old mats.
Storing your Cricut cutting mats
Always hang your mats after washing and also when storing. I find that this is the best way to keep them from bending, warping and getting lost. For hanging after washing, use skirt/pant hangers, and when they are dry, replace the protective film and use Cutting mat hooks.
Never hang or store your mats in direct sunlight; the heat can cause warping and dry them out.
Keep your Weeding scraps under control.
Use a Silicone scrap holder when weeding. I use one that has a suction cup on the bottom, and it can be positioned just about anywhere. It helps keep small weed bits that may be sticky from falling or getting stuck to your project. You can also use a wearable nail polish holder. They are worn on your finger and have silicone slots in the top where you can add your weeded bits of scrap
Securing Vinyl during Intricate Weeding.
When weeding intricate and difficult projects, consider using painter’s tape to hold your vinyl in place. You can tape it to a flat surface, to hold the project still. I also use binder clips on a Cricut self-healing mat, for projects that I need to turn or move while weeding. Both methods work well when weeding.
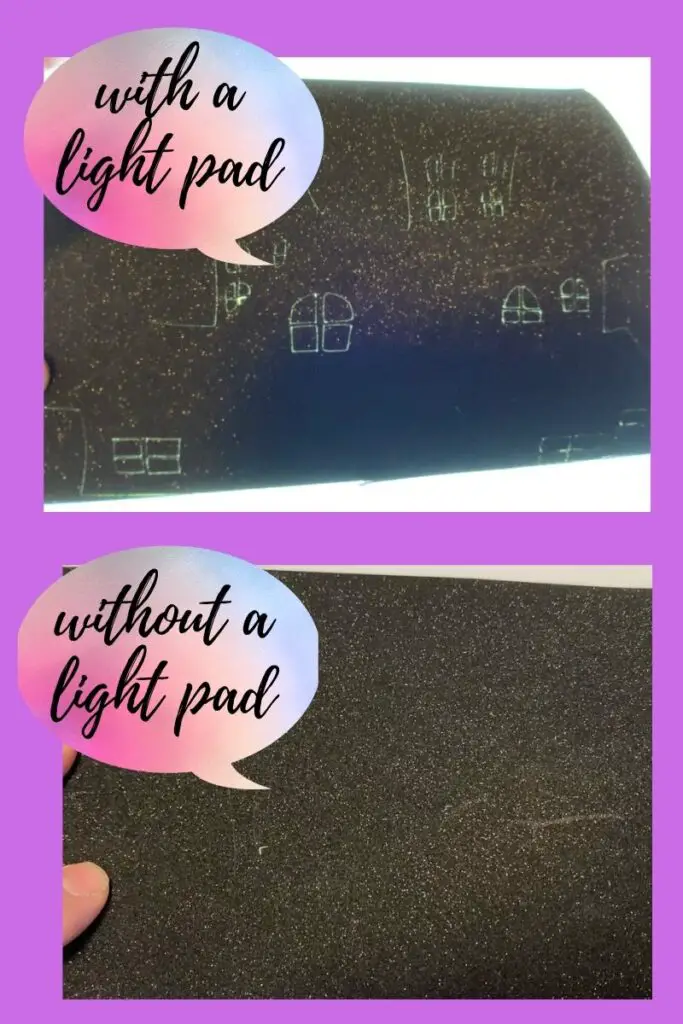
Using a light pad
Using a light pad can assist in seeing difficult lines when weeding. I find that it only helps about half of the time. I find it doesn’t help on white but does help to show up cut lines on darker-coloured materials. After testing a. couple of off brands and the Cricut Bright Pad Go, my pick is the Bright Pad Go.
Below is an example of Black Shimmer vinyl with and without a light pad. This project was used on my Adhesive Vinyl Halloween Wax Candles” project.
When choosing a light pad, choose one that suits your needs for weeding. If you make large projects, try to get one large enough to hold your materials. Get one that has adjustable brightness, which is helpful with different coloured vinyl. Choose one that has clips or can accommodate binder clips to hold your materials in place. If you craft on the go or like to weed while watching tv, a portable wireless Cricut Bright Pad may be a better option. Do not choose a light pad that is for diamond painting or has permanent grid lines, as they can interfere with weeding lines.
Side note – the silicone scrap holder with a suction cup easily sticks to the Bright Pad and other light pads
Using Baby powder
For weeding difficult designs on coloured and patterned vinyl, you can dust some baby powder on the vinyl to make the lines show a little better. I use an old-fashioned style powder puff (not the sponge type). The soft texture will not damage the vinyl.
To dust the surface, blot some powder onto the puff and remove any excess. Tap the puff lightly onto the surface of the vinyl. You should immediately see the lines appear. Once you have completed your weeding, blow off any excess powder. (Blow away from your weeded vinyl and craft area) Store your puff in a baggie or plastic container to keep it clean.
For HTV vinyl or infusible ink, make sure the surface of the vinyl is clean before using the heat press.
Weeding tools and non-Cricut tools
Just because you are using a Cricut machine does not mean that you can’t use other brands of tools. There are other tools, such as weeding tools, available that are just as good. I use mostly Cricut tools, except for an air-release weeding pen, and an X-Acto knife, but I do have a friend who is a dentist, and in their house, they use some of the dental tooth cleaning tools for weeding (Crazy Hunh?)
Cleaning your Cricut machine
Keeping your Cricut cutting machine clean is a must. The fibres, from the materials being cut, can build up over time. User a can of compressed air to clean the inside of the cutting machine. Using a Q-tip and rubbing alcohol, clean the guide wheels. Do not use anything abrasive on them as it could damage the teeth.
Use compressed air to clean the inside of the machine. Blow out the areas around the clamps and under the rods. Do not use cloths or brushes inside of the machine.
Choosing transfer tape
This was probably the only thing that frustrated me over and over. I’d spend time creating a design, cutting and weeding, only to have the transfer tape either too sticky and having a nightmarish time, getting the design onto my item or having the transfer tape seem too weak to pull the design off of the backer paper. One project I made 4 times (a decal for the front of a small boat fridge) was so frustrating that I didn’t use my Cricut machines for a month after it was over.
I tried strong grip transfer tape, standard grip transfer tape, and a non-Cricut brand of transfer tape, with no luck. Finally, I tried Con-Tact paper and was shocked and overjoyed to find a product that worked. If you are having trouble, give Con-tact paper a try. A lot of Cricut users swear by it.
The product I use ALL THE TIME now is Con-tact paper.
TEST Cuts!
Do a test Cut. This is especially important when you are cutting expensive materials or materials that you have a limited supply of. Let’s face it! Materials are pricey, and no one likes to waste them.
To do a test cut:
- Open Cricut Design Space
- Start a new project.
- Choose shapes from the menu on the left side of the canvas.
- Choose any shape from the shapes menu.
- Resize it on your canvas to a small size.
- Select “Make it”
- Place the shape into the corner of the canvas
- Continue
- Make sure your machine is connected.
- Select the material that you will be cutting. Sometimes you have to experiment with different material choices to get the right cut and pressure.
- Depending on the material, adjust pressure as needed. (I often select more)
- Once you are ready, push the flashing “go” light on your cutting machine to activate the cutting process.
- When complete, unload your mat.
- Check the cut lines and make sure that they are completely cut and easy to weed.
- Once you are satisfied that the material, pressure and cut are correct, proceed with cutting your design.
Setting the proper pressure and material before cutting
The default pressure is standard. The other options are Less and More. I rarely use the “less” pressure option, but more often use “more“. I find using more gives me a cleaner cut and prevents me from having to do another pass.
Sometimes, when you are using a product that is not listed on the drop-down menu or it is not a Cricut product, try to choose a similar weight and style of product.
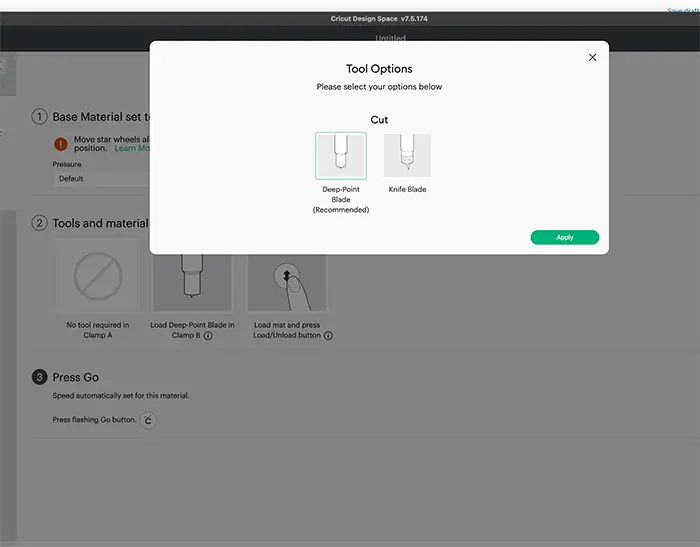
For example. I often cut thin foam sheets; the Cricut machine states to use the deep point blade. I find that craft foam sheets cut better with the rotary cutter (depending on the thickness). To accommodate this, I chose felt from the fabric drop-down menu, as the felt is similar in thickness and weight to the foam that I am using
Using the Edit Tools selection
The choices are limited when you want to change the cutting tool, and it is not an option available for all materials.
I use the same foam example in the image below. Cutting the foam calls for the use of the Deep Point Blade. When I select the ‘Edit Tools” option I get to choose between the “Deep Point Blade” or the “Knife blade”. You will also see which is the recommended tool. Neither of these tools is what I want to use, so the only way to get the rotary tool is to change the material to “trick” the machine into thinking I’m cutting a different material.
Doing another pass
You can easily do another pass if you notice that your project does not appear to be cut properly. DO NOT UNLOAD THE MAT! When your cut is complete, simply press the flashing Cricut light and the machine will do another cut over the first one. If you unload and reload the mat, you run the risk of the lines not lining up. Caution is recommended when doing another pass on intricate cuts.
Storing and organizing Vinyl
Organizing your vinyl will make it easier to get the right vinyl for your projects quickly and easily. I always keep the HTV and the adhesives separate and then in smaller groups: permanent adhesive, removable adhesive, patterned adhesive, commonly used colours, and infusible inks.
For keeping your vinyl rolls neatly rolled, I use slap bracelets. I get them in basic colours and have them colour-coded. Red is for HTV, black is for removable and green is for infusible ink and so on.
For Craft room storage, the following are great options
Stackable vinyl storage: These work great for standard and smaller-sized rolls. I have some 25 and 50-foot rolls that this is not going to work with, so be sure to check the maximum roll size first, if you use a roll larger than the standard roll.
Plastic bag storage holders also work well for standard-sized rolls.
Over the door or closet hanging roll holder
These are great when cupboard and shelf space are limited. These hang neatly in a closet and can be taken out and placed on the back of the door or a wall hook for easy access. Hang like products together for easy organization
Larger rolls often don’t fit onto the conventional roll holders but a12 by 12-inch cardstock plastic box fits them just perfectly and they easily stack and are clear-sided, so you can easily see what’s inside.
For 12 by 12-inch vinyl sheets
For upright storage, these cardstock file holders are perfect. They have plastic dividers that you can apply labels to, to differentiate between your different types of vinyl. If you have ever scrapbooked, you probably already have these paper holders.
Stackable paper trays are great for on the shelf or desktop. You can add to them as you accumulate more vinyl sheets.
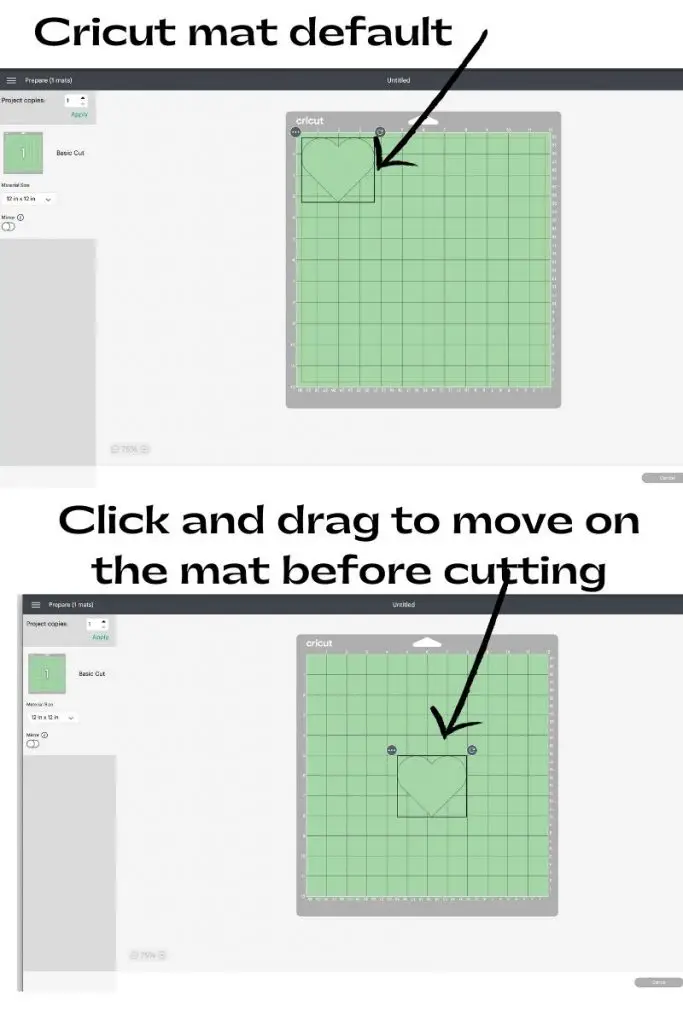
Spread the cutting around
If you are not cutting a large project, you will see that your cutting starts in the top left corner of your mat. Spreading the cutting area around your mat will ensure that the entire surface of your mat gets utilized. This should make your mat last longer since you are using the entire surface.
To move your cutting area on your mat, after you select “make it”. Simply click on your object and drag it to another spot on the mat. When you have it in the desired position, let go of your mouse. If you like the position, continue cutting
Using heat-resistant tape
Heat-resistant tape is an amazing product that holds your HTV in place when using your heat press. The tape does not leave any residue on your base material. It keeps your design in the perfect position, which is awesome when layering colours.
Can I use a household Iron or do I need a heat press?
Heat press or Iron? You can use a household iron, but beware of a few issues. You can not control or set the temperature for your household iron in the same way you can for a heat press. A household iron will have a fabric setting, and a heat press has a temperature setting. Be sure to check your household iron temperature guide for the fabric setting to get as close as possible to the needed temperature to avoid burning. Generally speaking, you will need a lot less time with a household iron than a heat press. Be sure to check your design after a few seconds to avoid overheating.
Do not use Steam settings!
A heat press is designed to cover the entire design for even pressure and temperature. You should not move your heatp[ress or iron during application as doing so can move your design and cause wrinkles.
The sizes of heat presses vary, as well as brands and designs. A small Cricut mini heat press is great for small projects, such as hats, basketballs and small objects. You can also consider a large tabletop commercial-style press that has attachments for hats, plates, and mugs. Choosing a press will depend on need, budget and space.
Always hold your heat-press still while pressing. Movement during pressing can cause wrinkles or ghosting in your finished design.
Always use a Teflon sheet or parchment paper between the project and your heat press or iron.
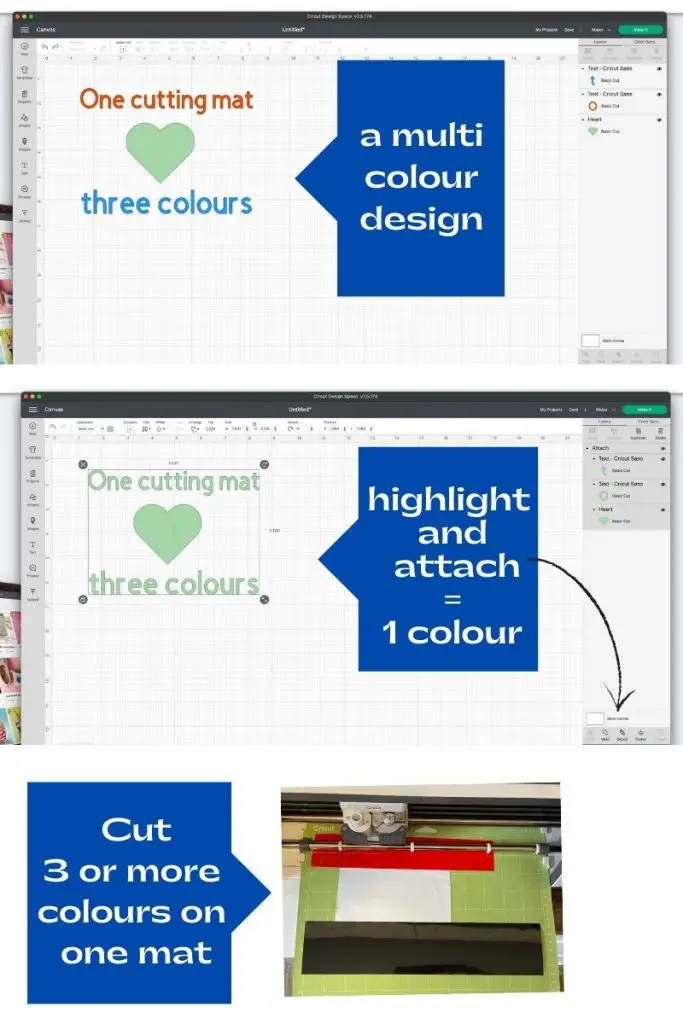
Use ATTACH
Once you have completed a design (especially one with words or writing) and are ready to make it, use attach. This will keep all your letters together and everything in the right spot. Just remember that if you are doing multiple colours, “Attach” will also change them to all one colour, so just attach the same colours unless you are cutting multiple colours on one mat.
Cut multiple colours at once
For smaller projects with multiple colours, use as many colours on one mat as will fit.
To use one mat for multiple colours, follow these simple instructions.
1 – Create your multicoloured design
2 – Drag a bounding box around your multi-colour design.
3 – Select Attach from the menu. You will see your design shift to one colour.
4 – Arrange the coloured material on your cutting mat, making sure to line them up with the on-screen mat.
5 – When you have all the materials on your mat, select “Make “
Saving your fabric grip mat
For fabrics with a lot of loose fibres or hairs, such as fleece, felt or faux fur. Place your fabric onto the adhesive side of Con-tact paper. Apply the contact paper (non-sticky side) onto your cutting mat. Complete the cut and remove the fabric from the contact paper, and then remove the contact paper from your mat. This will extend the life of your cutting mat.
Applying Designs onto rounded surfaces.
When applying designs onto curved or rounded surfaces like glasses, ornaments, sports balls and mugs, cut tiny slits in the transfer sheet. Be careful not to slice into your design. Cutting small slits into the transfer sheet will help to keep the design flat for a smooth application.
Remove air bubbles
Use a Cricut Brayer or Scraper to make sure all air bubbles are gone and the materials to be cut are flat and adhered to your cutting mat. Rolling over the mat before cutting only takes a couple of seconds and can save the frustration of poorly cut areas or snags in your material.
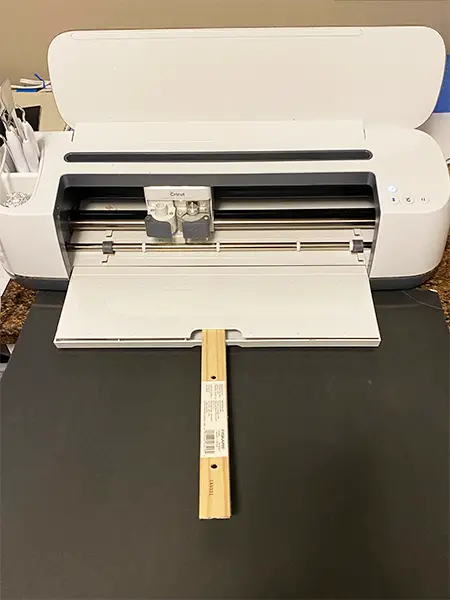
Use a Ruler
Use a ruler to hold to add extra support for your cutting mat. The ruler will slide into the slot in the door of the cutting machine. If you have a Maker 3 or Air Explore 3, you will have the option of purchasing a roll holder. The longer rolls that the roll holder uses are not compatible with the other models.
Leave Space behind your machine.
When your machine starts its cut, the mat will feed through the back of the machine and then return to its starting place before the cutting starts. Even if you are just cutting a small project, you will need enough room behind the cutting machine for the mat to move freely back and forth
Store Scraps for small projects
Use small containers that you have marked to keep smaller pieces of leftover unused materials. Plastic clear photo boxes orclear storage stackable boxes are perfect. Keep them handy for use when needing smaller pieces for layered or small projects.
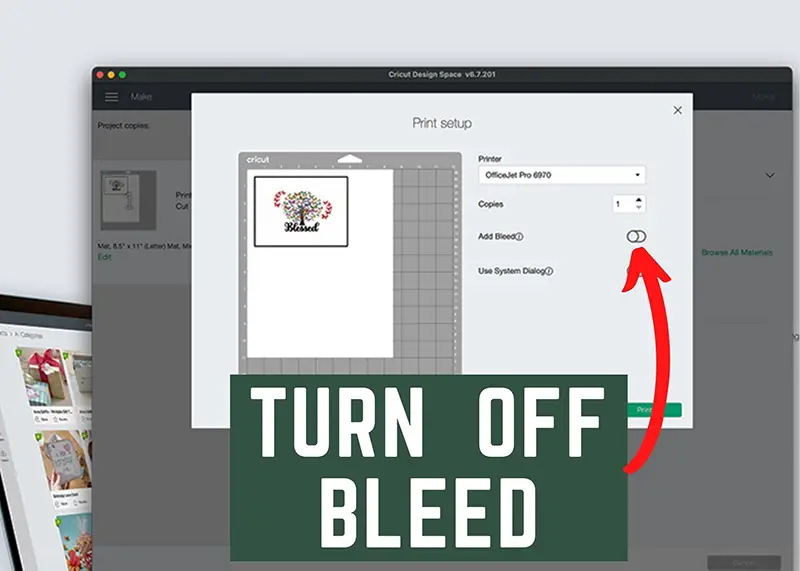
Print and Cut Tip
When using Print and Cut, if you have a choice of printers, use an Inkjet printer. The Cricut seems to see the restoration marks better.
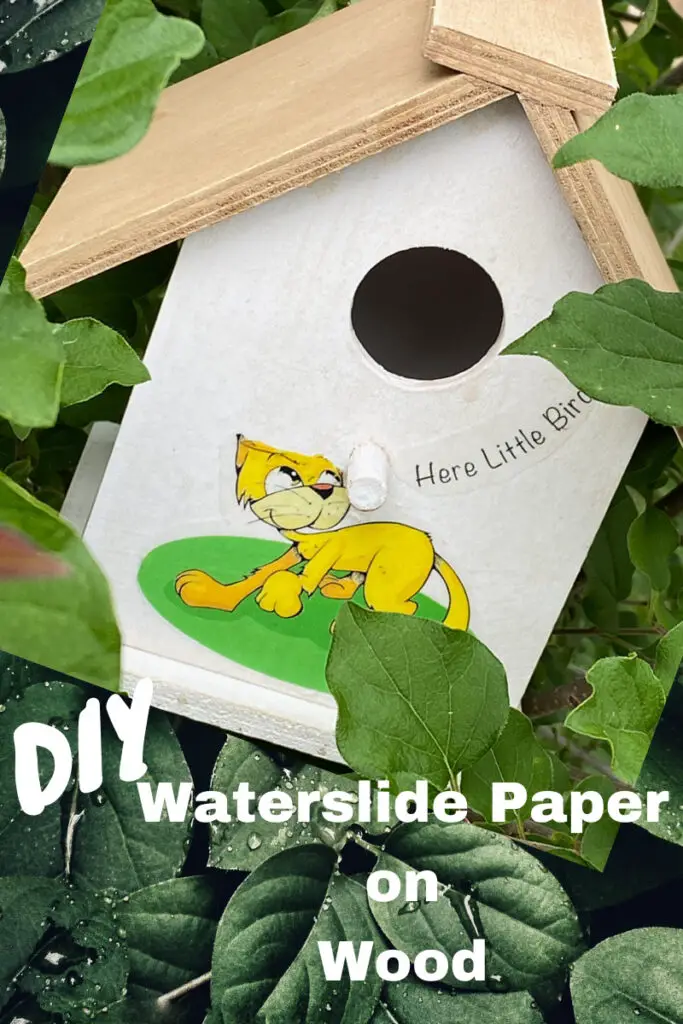
Also, when using waterslide paper, turn off the bleed just before you print. You will see it on the screen when you are prompted to send your image to the printer on the print setup page.
Doing a lot of T-shirts?
Getting designs centred on t-shirts and hoodies can be a bit of guesswork and practice. To make it a little easier, consider using a T-Shirt ruler. T-shirt rulers have measurements that easily mark the center of the shirt and are available in a wide variety of sizes. If you don’t want to use a rule, pull a t-shirt out of your dresser and use it as a template to get your design in the right spot before pressing it on.
I hope you found some or all of these great Cricut tips for beginners useful.
Happy Crafting.


Thank you for visiting Baker Street Living.
This website contains affiliate links. As an Amazon affiliate, I earn a small commission from qualifying purchases (at no cost to you).